By: CS2103T-W12-1 Since: Jan 2020 Licence: MIT
- 1. Introduction
- 2. Quick Start
- 3. Features
- 3.1. Showing the Help message -
help[Done by - Cher Wei Jie] - 3.2. Inserting an order:
insert[Done by Amos Cheong Jit Hon] - 3.3. Returning an order :
return[Done by - Cher Wei Jie] - 3.4. Editing an order :
edit[Done by - Kenny Ho Si Chong] - 3.5. Deleting an order :
delete[Done by - Loh Jeremy Wen Jun] - 3.6. Clearing all entries :
clear[Done by - Eng Xuan En] - 3.7. Importing a list of orders :
import[Done by - Eng Xuan En] - 3.8. Searching for parcels using their attributes:
search[Done by Kenny Ho Si Chong] - 3.9. Viewing orders located at the same area or postal sector:
nearby[Done by - Loh Jeremy Wen Jun] - 3.10. Listing orders :
list[Done by Amos Cheong Jit Hon] - 3.11. Delivering an order or return order :
delivered[Done by - Cher Wei Jie] - 3.12. Showing statistics :
show[Done by Amos Cheong Jit Hon] - 3.13. Exiting the program :
exit - 3.14. Saving the data
- 3.1. Showing the Help message -
- 4. FAQ
- 5. Command Summary
- 6. Glossary
1. Introduction
This user guide provides in-depth documentation on the Delino desktop application: quick start guide, features, FAQ, command summary, and glossary.
Delino is for couriers who prefer to use a desktop app for managing their delivery tasks. It is optimised for those who have a strong preference towards Command Line Interface (CLI) while still enjoying the benefits of a Graphical User Interface (GUI). Sounds interesting? Have a quick look at our tutorial Section 2, “Quick Start” to get started. Have a delightful journey using Delino!
1.1. Product Information
Are you still using pen and papers or Excel to keep track of all your orders?
With Delino, you can be rest assured that it will help you to keep track of a large number of orders in the most efficient way possible. Are you interested in improving your parcel delivery management? Read further to discover the features of Delino!
1.2. How to navigate this user guide
Throughout this user guide, you might encounter additional symbols. These symbols are used to
highlight important information.
This user guide uses the following symbols:
|
This block contains additional notes. |
|
This block contains additional tips. |
|
This block contains warning information. |
|
This block contains important information that you should be mindful of. |
text markup : This is used to indicate keywords such as command arguments to Delino. (e.g. exit)
[FLAG] : For the various commands, you might encounter keywords placed in square brackets.
(e.g. nearby [FLAG] AREA)
These indicate the optional arguments to a command.
Keywords that are capitalized represent all possible combinations of an argument.
(e.g. [FLAG] represents all possible flag arguments available).
For the list of all possible combinations of an argument, you can refer to the glossary
Finally, you will encounter links to external web pages for additional information. These links will look like this.
2. Quick Start
-
Ensure you have Java
11or above installed in your Computer. -
Download the latest
CS2103T-W12-1.Delino.jarhere. -
Copy the file to the folder you want to use as the home folder for your Delino.
-
Double-click the file to start the app. The GUI should appear in a few seconds.
-
If you are a Mac user and are unable to open the jar file after double-clicking, please open Terminal and change the directory to the directory that the jar file was downloaded at. Then, type the following command to open the Delino application:
java-jarCS2103T-W12-1.Delino.jar -
If you are a Windows user and are unable to open the jar file after double-clicking, please open Command Prompt and change the directory to the directory that the jar file was downloaded at. Then, type the following command to open the Delino application:
java-jarCS2103T-W12-1.Delino.jar
-
-
Type the command in the command box and press Enter to execute it.
e.g. typinghelpand pressing Enter will open the help window. -
Some example commands you can try:
-
listdone: lists all delivered orders and return orders. -
inserttid/1023456789n/Amos Cheonga/Blk 572 Hougang st 51 #11-37 S530572p/90010019dts/2020-06-10 1650w/Marsilingcod/$5c/Leave it at the riser type/glass: adds an order where the receiver name isAmos Cheonginto Delino. -
delete-o3: deletes the 3rd delivery order shown in the current order list -
exit: exits the app
-
-
Refer to Section 3, “Features” for a more detailed explanation of each command.
3. Features
In this section you will be able to learn about the various features of Delino.
Current Features |
Command Format
-
Words in
UPPER_CASEare the parameters to be supplied by you e.g. ininsert n/CUSTOMER_NAME,CUSTOMER_NAMEis a parameter which can be used asinsert n/John Doe. -
Items in square brackets are optional e.g
n/CUSTOMER_NAME [c/COMMENT]can be used asn/John Doe c/Leave the parcel outsideor asn/John Doe. -
Parameters can be in any order e.g. if the command specifies
n/CUSTOMER_NAMEp/PHONE_NUMBER,
p/PHONE_NUMBERn/CUSTOMER_NAMEis also acceptable.
3.1. Showing the Help message - help [Done by - Cher Wei Jie]
-
In this section, you will learn more about the
helpcommand and how to use it.
Why would you want to use thehelpcommand? You can use thishelpcommand to see a summary of all available features of Delino.
3.1.1. How to use the Help command?
Here is how you can use the help command to show a summary of all available commands in Delino.
Step 1 : Type in the keyword help.
Step 2 : Press Enter on your keyboard to see the magic!
3.1.2. What constitutes a valid Help command?
The syntax for a valid help command can be seen below!
-
help
| Scenario | Command | Result |
|---|---|---|
If you want to view all the available commands in Delino. |
|
A pop-up window will be shown that includes a summary to briefly explain all the commands that Delino offers. |
3.2. Inserting an order: insert [Done by Amos Cheong Jit Hon]
This section shows you how to use the insert Command and the relevant examples.
Whenever you have a new delivery order to make, you have to add it into your list of orders.
The insert Command is in charge of this functionality.
3.2.1. How to use the Insert Command
|
Orders inserted are sorted by their delivery date and time. |
Here are the steps on using the insert Command:
Step 1 : Type in the keyword insert
Step 2 : Add in the prefixes TRANSACTION_ID CUSTOMER_NAME
ADDRESS PHONE_NUMBER EMAIL
DELIVERY_DATE_AND_TIME WAREHOUSE_LOCATION CASH_ON_DELIVERY
of the delivery orders
Step 3 (Optional) : Add in the Customer comment and type of item using the prefixes [COMMENT_BY_CUSTOMER]
[TYPE_OF_ITEM]
Step 4 : Press Enter on your keyboard to see the magic!
3.2.2. What constitutes a valid Insert command
Here is the syntax of the insert Command :
insert tid/TRANSACTION_ID n/CUSTOMER_NAME a/ADDRESS
p/PHONE_NUMBER e/EMAIL dts/DELIVERY_DATE_AND_TIME
w/WAREHOUSE_LOCATION cod/CASH_ON_DELIVERY [COMMENT_BY_CUSTOMER]
[TYPE_OF_ITEM]
|
|
These are the possible combinations of the insert command:
| Scenario | Command | Result |
|---|---|---|
Insert the order without a comment and no item type. |
|
You should be able to see that the order with transaction id |
Insert the order with all the order attributes including the non-compulsory ones. |
|
You should see that the order with transaction id |
|
3.3. Returning an order : return [Done by - Cher Wei Jie]
-
In this section, you will learn more about the
returncommand and how to use it.
Why would you want to use thereturncommand? You can use thisreturncommand to create a new return order to be added into the return order list.
3.3.1. How to use the Return command?
|
Return orders inserted are sorted by their delivery date and time. |
Here is how you can convert an order into a return order or create a new return order by following the steps below:
Step 1 : Type in the keyword return.
Step 2a : If you would like to convert an existing order into a return order,
provide the TRANSACTION_ID and the RETURN_DATE_AND_TIME to the order to be converted.
Step 2b: If you would like to create a new return order in the return order list, provide the
TRANSACTION_ID CUSTOMER_NAME ADDRESS
PHONE_NUMBER RETURN_DATE_AND_TIME WAREHOUSE_LOCATION
EMAIL [COMMENTS_BY_CUSTOMER] [TYPE_OF_ITEM] of the parcel.
Step 3 : Press Enter on your keyboard to see the magic!
|
3.3.2. What constitutes a valid Return command?
The syntax for a valid return command can be seen below!
-
returntid/TRANSACTION_IDrts/RETURN_DATE_AND_TIMEorreturntid/TRANSACTION_IDn/CUSTOMER_NAMEa/ADDRESSe/EMAILw/WAREHOUSE_LOCATIONp/PHONE_NUMBERrts/RETURN_DATE_AND_TIMEc/[COMMENTS_BY_CUSTOMER]type/[TYPE_OF_ITEM]
|
These are the possible combinations of the return command:
| Scenario | Command | Result |
|---|---|---|
If you want to convert the order with Transaction Id |
|
This order will be removed from the order list and be added into the returns list as a return order with the updated return time stamp. |
If you want to create a new return order in the return order list. |
|
A return order with the input attributes will be created into the return order list. |
|
|
3.4. Editing an order : edit [Done by - Kenny Ho Si Chong]
In this section, you will be able to find out how to properly use the edit command and the relevant examples.
Why will you want to use the edit command? If you wish to edit any field of a parcel, the edit command will provide you the means to do so.
3.4.1. How to use the Edit command
Here is how you can edit the details of any parcel by following the steps below:
Step 1 : Type in the keyword edit
Step 2 : Provide the FLAG corresponding to the parcel order type you want to edit
Step 3 : Provide the INDEX of the parcel displayed on the screen that you wish to edit
Step 4 : Provide the ORDER_ATTRIBUTE_PREFIX coupled with a front slash / and the new value you want to change to.
Step 5 : Press Enter on your keyboard to see the magic!
3.4.2. What constitutes a valid Edit command
The syntax for a valid edit command can be seen below:
-
editFLAGINDEXORDER_ATTRIBUTE_PREFIX/NEW_VALUE[ORDER_ATTRIBUTE_PREFIX/NEW_VALUE]…
|
These are the possible combinations of the edit command:
| Scenario | Command | Result |
|---|---|---|
If you want to edit the name of the first return order displayed on returns list |
|
The index |
If you want to edit the phone number of the second order displayed on the orders list. |
|
The index |
If you want to edit the address of the first order displayed on the orders list. |
|
The index |
If you want to edit the name, phone number and address of the third return order displayed on the returns list. |
|
The index |
|
3.5. Deleting an order : delete [Done by - Loh Jeremy Wen Jun]
In this section, you will learn more about the delete command,
how to use it and the
possible usage scenarios of the delete command.
The delete command is useful if you would like to delete a specific order from either
the order list or return order list.
This would allow you to correct any accidental additions that you may have made
when inserting orders or importing an order file.
3.5.1. How to use the Delete command
In this section, you learn more about the exact inputs required to use the delete command.
Here are the steps you should follow to delete an order using the delete command:
Step 1 : Type in the keyword delete
Step 2 : Provide a FLAG to indicate which list to delete your order from
|
A |
Step 3 : Provide an INDEX to indicate the specific order to delete based on the list
|
The |
Step 4 : Press Enter on your keyboard to see the magic!
3.5.2. What constitutes a valid Delete command
In this section, you will learn more about the syntax of the delete command
The syntax for a valid delete command is the following:
delete FLAG INDEX
3.5.3. Delete command usage scenarios
In this section, you will learn more about the various usage scenarios of the delete command!
These are the possible combinations of the delete command:
| Scenario | Command | Result |
|---|---|---|
If you want to delete the second order from the order list. |
|
Deletes the 2nd order from the order list. |
If you want to delete the third order from the return order list. |
|
Deletes the 3rd return order from the return order list. |
If you want delete the first order that belongs to the customer 'Betsy'. |
|
Deletes the 1st order in the results of the |
If you want to obtain all orders in the return order list located in the central region of Singapore. |
|
Deletes the 1st return order in the results of the |
3.6. Clearing all entries : clear [Done by - Eng Xuan En]
In this section, you will be able to find out how to use the clear command and
the possible combinations of the clear command.
If you wish to delete huge amount of orders and return orders from Delino, the clear command will provide you the means
to do so.
3.6.1. How to use the Clear command
Here is how you can clear the order list and return order list by following the steps below:
Step 1 : Type in the keyword clear.
Step 2 (Optional) : Provides the -f flag if you confirm that you would like to force clear both order list and return order list.
Step 3 (Optional) : Provides the -o or -r flag if you only want to clear either order list or return order list respectively.
Step 4 : Press Enter on your keyboard to send the instruction to Delino.
|
3.6.2. What constitutes a valid Clear command
In this section, you will learn about the syntax for a valid clear command and the possible combinations of the command.
The syntax for a valid clear command can be seen below:
-
clear[FLAG]
|
These are the possible combinations of the clear command:
| Scenario | Command | Result |
|---|---|---|
If you want to have a confirmation notice before clearing both lists. |
|
Pop-up will appear and ask the user for confirmation to clear both order list and return order list. |
If you don’t want to get prompt before clearing both lists. |
|
Both order list and return order list will be cleared immediately. |
If you want to have a confirmation notice before clearing return order list. |
|
Pop-up will appear and ask the user for confirmation to clear the return order list. |
If you don’t want to get prompt before clearing return order list. |
|
Only return order list is cleared immediately. |
If you want to have a confirmation notice before clearing order list. |
|
Pop-up will appear and ask the user for confirmation to clear the order list. |
If you don’t want to get prompt before clearing order list. |
|
Only order list is cleared immediately. |
3.7. Importing a list of orders : import [Done by - Eng Xuan En]
In this section, you will be able to find out how to use the import command and
the possible combination of the import command.
If you wish to add huge amount of orders and return orders to Delino, the import command will provide you the means
to do so.
3.7.1. How to use Import command
Here is how you can import the orders and return orders into Delino by following the steps below:
Step 1 : Type in the keyword import.
Step 2 : Provide the CSV file name that you would like to import with the .csv extension behind.
Step 3 : Press Enter on your keyboard to send the instruction to Delino.
3.7.2. What constitutes a valid Import command
In this section, you will learn about the syntax of a valid import command, the format for both orders and return orders in the CSV file
and the possible combination for the import command.
The syntax for a valid import command can be seen below:
-
importFILE_NAME
importis the command andFILE_NAMEis the file name that is required to import with the .csv extension behind.
|

Figure 2. CSV File Save Type
|
The data in the CSV file should be written in the following format:
-
Order data format:
ot/ORDER_TYPE,tid/TRANSACTION_ID,n/NAME,a/ADDRESS,p/PHONE_NUMBER,e/EMAIL,dts/DELIVERY_DATE_&_TIME,w/WAREHOUSE_LOCATION,cod/CASH_ON_DELIVERY,[c/COMMENTS_BY_CUSTOMER],[type/TYPE_OF_ITEM]Example:

-
Return order data format:
ot/ORDER_TYPE,tid/TRANSACTION_ID,n/NAME,a/ADDRESS,p/PHONE_NUMBER,e/EMAIL,rts/RETURN_DATE_&_TIME,w/WAREHOUSE_LOCATION,[c/COMMENTS_BY_CUSTOMER],[type/TYPE_OF_ITEM]Example:

|
There is only one possible combination for the import Command:
| Scenario | Command | Result |
|---|---|---|
If you want to import all of the orders and return orders at once via a CSV file. |
|
Import the contents of the CSV file, |
3.8. Searching for parcels using their attributes: search [Done by Kenny Ho Si Chong]
In this section, you will be able to find out how to properly use the search command and the relevant examples.
Why will you want to use the search command? If you wish to search for a parcel with specific keywords, the search command will provide you the means to do so.
3.8.1. How to use the Search command?
Here is how you can search for any parcel containing the keywords given by the following steps below:
Step 1 : Type in the keyword search
Step 2 (optional) : Provide -o flag if you want to only search for parcels in the order list. A -r flag also can be used to only search for parcels in the return order list.
|
If no flag is given in this step, |
Step 3 (optional) : If you wish to only specifically search for keywords in a field, you should provide the ORDER_ATTRIBUTE_PREFIX coupled with a front slash / and the keyword you want to search for.
Step 4 : Provide any number of alphanumeric words you wish to search for in the parcel.
Step 5 : Press Enter on your keyboard to see the magic!
|
3.8.2. What constitutes a valid Search command?
The syntax for a valid search command can be seen below:
-
search[FLAG]KEYWORD[MORE_KEYWORDS]…OR -
search[FLAG]ORDER_ATTRIBUTE_PREFIX/KEYWORD[MORE_KEYWORDS]…[ORDER_ATTRIBUTE_PREFIX/KEYWORD][MORE_KEYWORDS]…
|
These are the possible combinations of the search command:
| Scenario | Command | Result |
|---|---|---|
If you want to search for any return parcel containing the keyword |
|
Return all return order(s) containing keyword of |
If you want to search for any order parcel that contain the transaction id of |
|
Return all order(s) with transaction ID of |
If you want to search for any return parcel that contain the phone number of |
|
Return all return order(s) with phone number of |
If you want to only search for any order parcel that contains either the phone number |
|
Return all order(s) with either phone number of |
If you want to search for any parcel containing the name |
|
Return all parcel(s) with the name of |
|
3.9. Viewing orders located at the same area or postal sector: nearby [Done by - Loh Jeremy Wen Jun]
In this section, you will learn more about the nearby command,
how to use it and the
possible usage scenarios of the nearby command.
The nearby command is useful if you would like to obtain all orders located in the same
postal sector or region of Singapore. This would allow you to be more efficient with your delivery
orders.
3.9.1. How to use the nearby command
In this section, you learn more about the exact inputs required to use the nearby command.
Here are the steps you should follow to obtain all orders using the nearby command:
Step 1 : Type in the keyword nearby
Step 2 (optional) : Provide an optional FLAG that indicates which order list to
search (order list or return order list).
|
A |
By default, if no FLAG is provided, both order list and return order list will be searched.
Step 3 : Provide either a POSTAL SECTOR or an AREA
|
A An
A quick reference for the five areas of Singapore can be found here. You can obtain more detailed information about each area from this website |
Step 4 : Press Enter on your keyboard to see the magic!
3.9.2. What constitutes a valid nearby command
In this section, you will learn more about the syntax of the nearby command
The syntax for a valid nearby command can be one of the following:
1. nearby [FLAG] POSTAL_SECTOR
2. nearby [FLAG] AREA
|
An optional A An
A quick reference for the five areas of Singapore can be found here |
3.9.3. Nearby command usage scenarios
In this section, you will learn more about the various usage scenarios of the nearby command!
These are the possible combinations of the nearby command:
| Scenario | Command | Result |
|---|---|---|
If you want to obtain all orders in both the order list and return order list located in the the north region of Singapore. |
|
All orders in the order list and return order list that are located in the north region of Singapore will be displayed. |
If you want to obtain all orders in the order list located in the general location of |
|
All orders in the order list that are located in postal sector |
If you want to obtain all orders in the return order list located in the general location of |
|
All orders in the return order list that are located in the postal sector |
If you want to obtain all orders in the return order list located in the central region of Singapore. |
|
All orders in the return order list that are located in the central region of Singapore will be displayed. |
Suppose you are delivering an order to Buona Vista and would like to know all the orders located near
that region (central region of Singapore). Are you going manually look through all of your orders and
find those that are located near Buona Vista? |
|
All orders in the order list that are located in the central region of Singapore will be displayed. |
You can obtain more information about the various postal sectors in the following table:
| Postal Sector | General Location |
|---|---|
01, 02, 03, 04, 05, 06 |
Raffles Place, Cecil, Marina, People’s Park |
07, 08 |
Anson, Tanjong Pagar |
14, 15, 16 |
Queenstown, Tiong Bahru |
09, 10 |
Telok Blangah, Harbourfront |
11, 12, 13 |
Pasir Panjang, Hong Leong Garden, Clementi New Town |
17 |
High Street, Beach Road (part) |
18, 19 |
Middle Road, Golden Mile |
20, 21 |
Little India |
22, 23 |
Orchard, Cairnhill, River Valley |
24, 25, 26, 27 |
Ardmore, Bukit Timah, Holland Road, Tanglin |
28, 29, 30 |
Watten Estate, Novena, Thomson |
31, 32, 33 |
Balestier, Toa Payoh, Serangoon |
34, 35, 36, 37 |
Macpherson, Braddell |
38, 39, 40, 41 |
Geylang, Eunos |
42, 43, 44, 45 |
Katong, Joo Chiat, Amber Road |
46, 47, 48 |
Bedok, Upper East Coast, Eastwood, Kew Drive |
49, 50, 81 |
Loyang, Changi |
51, 52 |
Tampines, Pasir Ris |
53, 54, 55, 82 |
Serangoon Garden, Hougang, Punggol |
56, 57 |
Bishan, Ang Mo Kio |
58, 59 |
Upper Bukit Timah, Clementi Park, Ulu Pandan |
60, 61, 62, 63, 64 |
Jurong |
65, 66, 67, 68 |
Hillview, Dairy Farm, Bukit Panjang, Choa Chu Kang |
69, 70, 71 |
Lim Chu Kang, Tengah |
72, 73 |
Kranji, Woodgrove |
77, 78 |
Upper Thomson, Springleaf |
75, 76 |
Yishun, Sembawang |
79, 80 |
Seletar |
3.10. Listing orders : list [Done by Amos Cheong Jit Hon]
In this section, you will learn more about the list command and how to use it.
As a courier, you would want to take a look at all the orders that you have in your list of orders regardless of the
type of orders or the order status.
The list Command will enable you to view all these orders.
3.10.1. How does the List Command works
Here are the steps to execute the list command:
Step 1 : Type in the keyword list.
Step 2 : If you want to simply see all your delivery and return orders.
Otherwise, please proceed to Step 3. Else, skip to Step 4
Step 3 : Provide the following [KEYWORD] : done (Show all your completed orders) or undone (Show all your
uncompleted orders)
Step 4 : Press Enter on your keyboard and see the magic!
3.10.2. What constitutes a valid List command
The syntax of a valid list command is as shown:
list [KEYWORD]
These are the possible combinations of the list command:
| Scenario | Command | Result |
|---|---|---|
Display all orders. |
|
Show two lists of all orders. One list for delivery orders, the other for return orders |
Display all completed orders. |
|
Show two lists of all completed orders. One list for delivery orders, the other for return orders |
Display all uncompleted orders. |
|
Show two lists of all uncompleted orders. One list for delivery orders, the other for return orders |
|
3.11. Delivering an order or return order : delivered [Done by - Cher Wei Jie]
In this section, you will learn more about the delivered command and how to use it.
Why would you want to use the delivered command?
If you have delivered an order or return order, you can mark it as delivered with the delivered command.
3.11.1. How to use the Delivered command
This section will explain the steps needed to use the delivered command.
Here is how you can mark the details of any order or return order by following the steps below:
Step 1 : Type in the keyword delivered
Step 2 : Provide the FLAG corresponding to the parcel order type you want to mark as delivered
Step 3 : Provide the INDEX of the parcel displayed on the screen that you wish to mark as delivered
Step 4 : Press Enter on your keyboard to see the magic!
3.11.2. What constitutes a valid Delivered command
The syntax for a valid delivered command can be seen below!
-
deliveredFLAGINDEX
These are the possible combinations of the delivered command:
| Scenario | Command | Result |
|---|---|---|
If you want to mark the first return order displayed on returns list as delivered. |
|
The delivery status of the first return order displayed on the returns list will be changed to "Returned to Warehouse" |
If you want to mark the second order displayed on the orders list. |
|
The delivery status of the second order in the order list will be changed to "Delivered". |
|
|
3.12. Showing statistics : show [Done by Amos Cheong Jit Hon]
This section will explain more about the show command and how to use it.
At some point of time, you would want to know how many orders have you delivered or what is your earnings for today. Therefore,
you have to use the show command to view those information.
3.12.1. How to use the Show command
In this section, you will learn how to use the show Command.
Here is how you can show the statistics of your orders:
Step 1 : Type show
Step 2 : If you want to see your statistics for all the orders, simply type all and skip to Step 5
Step 3 : Type today to show the statistics for today or simply type in a date
in a date format of yyyy-mm-dd
Step 4 (Optional) : Type another date in yyyy-mm-dd format to see the statistics within the date range.
This date must be after or equal to the date provided previously
Step 5 : Press Enter on your keyboard to see the magic!
|
The
|
3.12.2. What constitutes a valid Show Command
In this section, you will learn about the correct syntax for a valid show command and all the
different combinations of the command.
All the syntax for a valid show command is shown below:
-
showSTART_DATE[END_DATE] -
showall -
showtoday -
showDATE
|
These are the possible combinations of the show command:
| Scenario | Command | Result |
|---|---|---|
Showing all the orders statistics regardless of date. |
|
You will be brought to the Statistics tab and the statistics of all orders will be displayed to you. |
Showing the statistics for today. |
|
You will be brought to the Statistics tab and the statistics for today’s orders will be displayed to you. |
Showing the statistics for the date between today and the end date provided. |
|
You will be brought to the Statistics tab and the statistics between today’s date and
|
Showing the statistics for just the given date. |
|
You will be brought to the Statistics tab and the statistics in |
Showing the statistics within two given dates. |
|
You will be brought to the Statistics tab and the statistics for the date between |
3.13. Exiting the program : exit
In this section, you will be able to find out how to properly use the exit command and the relevant examples.
Why will you want to use the exit command? If you wish to exit the application, the exit command will allow you to do so.
3.13.1. How to use the Exit command
Here is how you can exit the application:
Step 1 : Type in the keyword exit
Step 2 : Say bye to Delino!
| Optionally you can click on the cross button of the application to exit! |
3.13.2. What constitutes a valid Exit command
-
exit
exit is the command word for this feature.
|
Scenario |
Command |
Result |
If you wish to exit the application because you’re en-route to delivering or after a long day of work. |
|
Delino will silently close the application window and awaits for your next usage. |
3.14. Saving the data
In this section, you will learn more about how Delino save your data.
-
Data is saved as JSON file in the hard disk automatically after any command that changes the data that is present.
-
There is no need for you to save manually.
|
It is intended behaviour for allowing the order or return order to have a timestamp before the current time when the data is loaded from JSON files. |
|
There is no need to alter the JSON file in the data folder! |
4. FAQ
-
Question: How do I transfer my data to another Computer?
Answer: You can transfer your data by:-
Installing the app in the new computer.
-
From your current Delino folder, transfer the data folder to your new Delino folder.
-
Overwrite any files if needed.
-
-
Question: If I am currently using Microsoft Excel to manage my orders, why should I use Delino?
Answer: Excel is not exactly optimized to display large amounts of data and it can be quite daunting to look at.
With Delino, we offer a centralized platform to easily manage all of your delivery orders!
The process to transfer all of your orders in Microsoft Excel is simple!
Simply use the import command! -
Question: How can I obtain more information about the various commands in Delino?
Answer: You can use the help command! -
Question: What is the difference between Orders and Return Orders?
Answer: Orders are used for delivering goods to the end user.
Return Orders are used for delivering goods that are rejected by the user. -
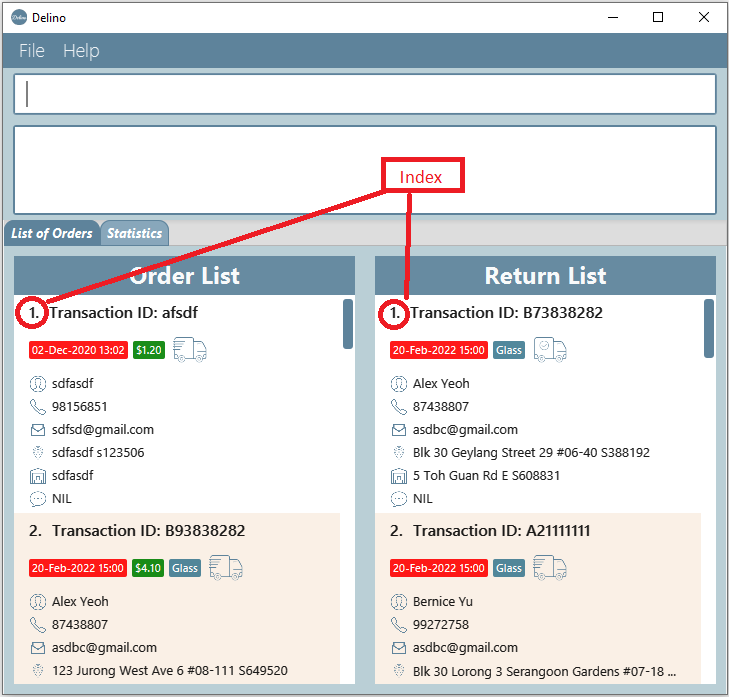
Question: Where can I find the
INDEXof an order/return order?
Answer: They can be found in the numbers located beside each individual order.
-
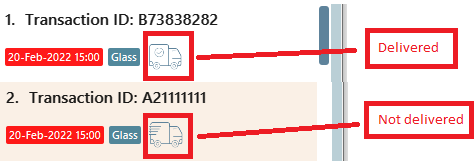
Question: How do I know the delivery status of an existing order/return order?
Answer:
Orders/Return orders that are delivered are indicated by the following icon:

Orders/Return orders that are not delivered are indicated by the following icon:

An example is shown below:
-
Question: What does the other symbols in the app mean?
Answer:
This icon represents an address:

This icon represents a comment:
This icon represents an email:

This icon represents a name:

This icon represents a phone:

5. Command Summary
In this section, you can find out more about the commands supported by Delino (their respective format and example).
If you would like to know more about a specific command, you can view more information by clicking the provided link in the table below.
| Command | Format | Example |
|---|---|---|
|
|
|
|
|
|
|
|
|
|
|
|
|
|
|
|
|
|
|
|
|
|
|
|
|
|
|
|
|
|
|
|
|
|
|
|
|
|
|
|
|
|
|
|
|
|
|
|
|
|
6. Glossary
6.1. Command Prefix
| Prefix | Order Attributes | Used in the following Command(s) |
|---|---|---|
ot/ |
Order Type |
|
tid/ |
Transaction ID |
|
n/ |
Customer Name |
|
a/ |
Address |
|
p/ |
Phone Number |
|
e/ |
||
dts/ |
Delivery Date And Time |
|
rts/ |
Return Date and Time |
|
w/ |
Warehouse Location |
|
cod/ |
Cash On Delivery |
|
c/ |
Comments by Customer |
|
type/ |
Type of Item |
6.2. Command Flags
| Flag | Meaning | Used in the following Command(s) |
|---|---|---|
-f |
Force clear, no user confirmation will be requested |
|
-o |
Order flag, Operation on order list |
|
-r |
Return Order flag, Operation on return order list |
6.3. Area Information of Singapore
Click here to navigate back to the Nearby Command!
| District | Areas | Location |
|---|---|---|
1 |
Marina Area |
|
2 |
CBD |
|
3 |
Central South |
|
4 |
Keppel |
|
5 |
South West |
|
6 |
City Hall |
|
7 |
Beach Road |
|
8 |
Little India |
|
9 |
Orchard |
|
10 |
Tanglin |
|
11 |
Newton |
|
12 |
Toa Payoh |
|
13 |
Central East |
|
14 |
Eunos |
|
15 |
East Coast |
|
21 |
Central West |
|
| District | Areas | Location |
|---|---|---|
16 |
Upper East Coast |
|
17 |
Far East |
|
18 |
Tampines |
|
| District | Areas | Location |
|---|---|---|
19 |
North East |
|
20 |
Ang Mo Kio |
|
28 |
North East |
|
| District | Areas | Location |
|---|---|---|
22 |
Far West |
|
23 |
North West |
|
24 |
Far North West |
|
| District | Areas | Location |
|---|---|---|
25 |
Far North |
|
26 |
North |
|
27 |
Far North |
|