Overview
Delino is a desktop application for couriers to manage delivery tasks. The user interacts with it using a CLI, and it has a GUI created with JavaFX. It is written in Java and has about 16 kLoC.
Summary of contributions
-
Major enhancement:
-
Added
returncommand (Pull request: #353)-
What it does: This command allows the user to create a new return order and add it into the Return Order List or convert a delivered order into a return order and add it into the Return Order List.
-
Justification: This feature is a must-have in Delino as it is a delivery management app. It allows the user to convert delivered orders into return orders and even create new return orders from scratch with the given parcel attributes.
-
Highlights: This feature requires a deep understanding of the AddressBook 3 (AB3) codebase and that took quite a bit of time. Two different logic execution paths had to be implemented and the testing of this feature also had to be extensive and exhaustive to ensure that no test cases were missed in the process of testing. The parametized testing functionality provided by JUnit 5 made this process to be much more convenient (https://www.baeldung.com/parameterized-tests-junit-5). Furthermore, new classes such as ReturnOrder, ReturnCommand, Parcel abstract class also had to be implemented for this feature to be fully functional. Therefore, this feature affects subsequent features to be added due to changes in inheritance of classes.
-
-
Added
deliveredcommand (Pull request: #302 )-
What it does: Allows the user to mark orders or return orders as delivered.
-
Justification: This is a must-have feature for a delivery management app like Delino. It allows the user to easily mark an order or return order as delivered after delivering the parcel.
-
Highlights: This feature required good understanding of the AB3 codebase and how the entire order list and return order list are edited to display the changes in the GUI. As such, this required a deep level of understanding of how the entire app worked so that the changes can be executed and displayed on the GUI from the start of the command till the end of execution.
-
-
Added the
helpcommand (Pull requests: #310)-
What it does: It displays a list of all Delino’s commands and llows the user to see the usage of each command in Delino and quickly be able to utilise Delino’s available features.
-
Justification: This command was rather simple to implement but the main problem faced was deciding the right window size for the pop-up help window as different screens have different resolutions and this resulted in some bugs that had to be re-looked at and fixed.
-
-
-
Minor enhancement:
-
Updated Delino’s icon image and link in the Developer Guide (Pull request: #245)
-
Added Non-functional requirements (NFR) in the Developer Guide (Pull request: #89)
-
Wrote Must-haves for user stories in Developer Guide (Pull request: #65)
-
Did the first mock-up for Delino’s UI using Adobe XD (Pull request: #85)
-
-
Code contributed: [Functional code & Test code]
-
Other contributions:
-
Project management:
-
In charge of team facilitation, code integration and UI design.
-
Set up Codacy with Jeremy to improve code quality of Delino’s repository. (Pull request: #61)
-
Ensure that project deliverables are completed on time.
-
-
Enhancements to existing features:
-
Adapted the given Address Book UI into Delino’s first draft UI. (Pull request: #85)
-
-
Documentation:
-
Updated Developer Guide to include Delivered Command (Pull request: #253)
-
Updated Developer Guide to include Return Command (Pull request: )
-
Updated Developer Guide to include Help Command (Pull request: )
-
-
Community:
-
PRs reviewed (with non-trivial review comments): (Pull requests: #118, #191, #226)
-
Reported bugs and suggestions for other teams in the class (examples: https://github.com/Cherweijie/ped/issues)
-
-
Tools:
-
Set up Codacy and updated its badge to link to our repository together with Jeremy (Pull request: #61)
-
-
Contributions to the User Guide
Given below are sections I contributed to the User Guide. They showcase my ability to write documentation targeting end-users. |
Introduction
This user guide provides in-depth documentation on the Delino desktop application: quick start guide, features, FAQ, command summary, and glossary.
Delino is for couriers who prefer to use a desktop app for managing their delivery tasks. It is optimised for those who have a strong preference towards Command Line Interface (CLI) while still enjoying the benefits of a Graphical User Interface (GUI). Sounds interesting? Have a quick look at our tutorial [Quick Start] to get started. Have a delightful journey using Delino!
Showing the Help message - help [Done by - Cher Wei Jie]
-
In this section, you will learn more about the
helpcommand and how to use it.
Why would you want to use thehelpcommand? You can use thishelpcommand to see a summary of all available features of Delino.
How to use the Help command?
Here is how you can use the help command to show a summary of all available commands in Delino.
Step 1 : Type in the keyword help.
Step 2 : Press Enter on your keyboard to see the magic!
What constitutes a valid Help command?
The syntax for a valid help command can be seen below!
-
help
| Scenario | Command | Result |
|---|---|---|
If you want to view all the available commands in Delino. |
|
A pop-up window will be shown that includes a summary to briefly explain all the commands that Delino offers. |
Returning an order : return [Done by - Cher Wei Jie]
-
In this section, you will learn more about the
returncommand and how to use it.
Why would you want to use thereturncommand? You can use thisreturncommand to create a new return order to be added into the return order list.
How to use the Return command?
|
Return orders inserted are sorted by their delivery date and time. |
Here is how you can convert an order into a return order or create a new return order by following the steps below:
Step 1 : Type in the keyword return.
Step 2a : If you would like to convert an existing order into a return order,
provide the TRANSACTION_ID and the RETURN_DATE_AND_TIME to the order to be converted.
Step 2b: If you would like to create a new return order in the return order list, provide the
TRANSACTION_ID CUSTOMER_NAME ADDRESS
PHONE_NUMBER RETURN_DATE_AND_TIME WAREHOUSE_LOCATION
EMAIL [COMMENTS_BY_CUSTOMER] [TYPE_OF_ITEM] of the parcel.
Step 3 : Press Enter on your keyboard to see the magic!
|
What constitutes a valid Return command?
The syntax for a valid return command can be seen below!
-
returntid/TRANSACTION_IDrts/RETURN_DATE_AND_TIMEorreturntid/TRANSACTION_IDn/CUSTOMER_NAMEa/ADDRESSe/EMAILw/WAREHOUSE_LOCATIONp/PHONE_NUMBERrts/RETURN_DATE_AND_TIMEc/[COMMENTS_BY_CUSTOMER]type/[TYPE_OF_ITEM]
|
These are the possible combinations of the return command:
| Scenario | Command | Result |
|---|---|---|
If you want to convert the order with Transaction Id |
|
This order will be removed from the order list and be added into the returns list as a return order with the updated return time stamp. |
If you want to create a new return order in the return order list. |
|
A return order with the input attributes will be created into the return order list. |
|
|
Delivering an order or return order : delivered [Done by - Cher Wei Jie]
In this section, you will learn more about the delivered command and how to use it.
Why would you want to use the delivered command?
If you have delivered an order or return order, you can mark it as delivered with the delivered command.
How to use the Delivered command
This section will explain the steps needed to use the delivered command.
Here is how you can mark the details of any order or return order by following the steps below:
Step 1 : Type in the keyword delivered
Step 2 : Provide the FLAG corresponding to the parcel order type you want to mark as delivered
Step 3 : Provide the INDEX of the parcel displayed on the screen that you wish to mark as delivered
Step 4 : Press Enter on your keyboard to see the magic!
What constitutes a valid Delivered command
The syntax for a valid delivered command can be seen below!
-
deliveredFLAGINDEX
These are the possible combinations of the delivered command:
| Scenario | Command | Result |
|---|---|---|
If you want to mark the first return order displayed on returns list as delivered. |
|
The delivery status of the first return order displayed on the returns list will be changed to "Returned to Warehouse" |
If you want to mark the second order displayed on the orders list. |
|
The delivery status of the second order in the order list will be changed to "Delivered". |
|
|

Product Information
Are you still using pen and papers or Excel to keep track of all your orders?
With Delino, you can be rest assured that it will help you to keep track of a large number of orders in the most efficient way possible. Are you interested in improving your parcel delivery management? Read further to discover the features of Delino!
Contributions to the Developer Guide
Given below are sections I contributed to the Developer Guide. They showcase my ability to write technical documentation and the technical depth of my contributions to the project. |
Design
This whole section on Delino’s Design Model can be found at here. This link is provided in the event if some of the cross links are not working, as they refer to documents done by another team member.
Model component

API : Model.java
The Model,
-
stores a UserPref object that represents the user’s preferences.
-
stores the Order Book and Return Order Book data.
-
exposes two unmodifiable lists, the
ObservableList<ReturnOrder>andObservableList<Order>that can be 'observed'.
e.g. The UI can be bound to this list so that the UI automatically updates when the data in the list change. -
does not depend on any of the other three components.
|
An Order class consists of ten different fields as shown in the image.
Every order is part of a UniqueOrderList and
every UniqueOrderList is part of an OrderBook. Similarly, a ReturnOrder class consists of nine different fields as shown in the image. Every return order is part of a UniqueReturnOrderList and every UniqueReturnOrderList is part of a ReturnOrderBook. |
Features
This whole section on the Return feature can be found at here. This link is provided in the event if some of the cross links are not working, as they refer to documents done by another team member.
Return Feature
In this section, the functionality of the return feature, the
expected execution path, the structure of the ReturnCommand class
and the interactions between objects with the ReturnCommand object will be discussed.
What is the Return Feature
The return feature allows the user to either:
1. Create a new return order from his/her input parcel attributes.
2. Convert an existing delivered order to a return order.
The return feature was implemented as a ReturnCommand in the Logic package.
The return command has two possible formats:
-
returnTRANSACTION_IDRETURN_TIMESTAMPIf the user provides a validTRANSACTION_IDandRETURN_TIMESTAMPin his input, the order with the givenTRANSACTION_IDwill be converted into a return order with the same attributes but with the updatedRETURN_TIMESTAMP. The created return order will be added into the return order list. -
returnTRANSACTION_IDNAMEADDRESSPHONE_NUMBEREMAILRETURN_TIMESTAMPWAREHOUSE_LOCATION[COMMENTS][ITEM_TYPE]If the user provides these compulsory parcel attributes, a return order with the given parcel attributes will be created and added to the return order list.
|
Execution paths of Return command
In this section, you will learn more about the execution paths for the return command.
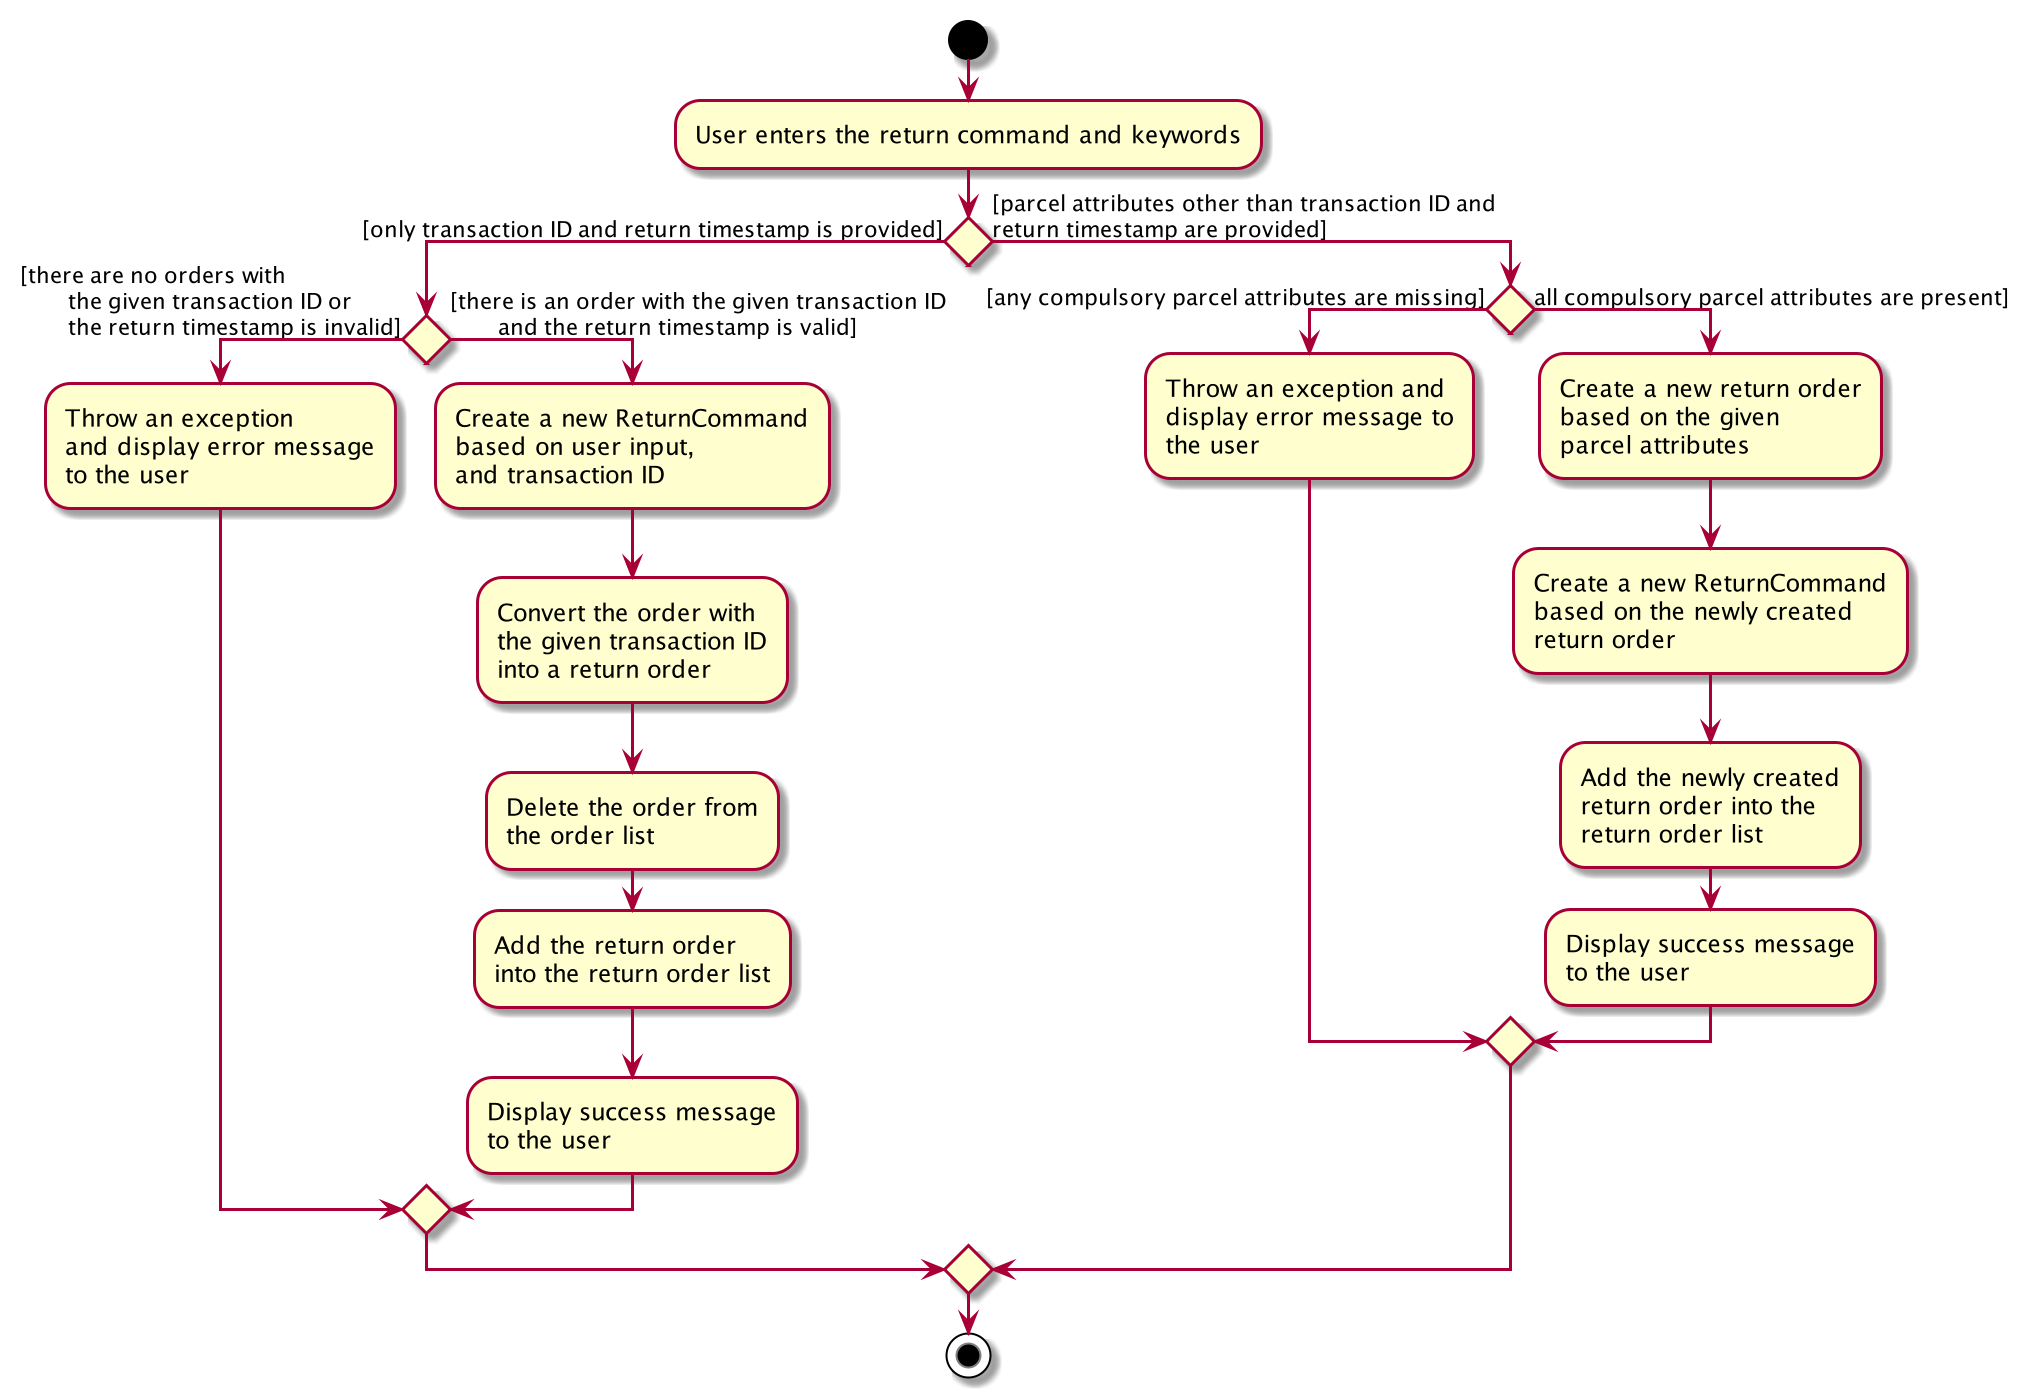
There are three possible execution paths for the return command
-
User provides an invalid
returncommand input
This will result in a parse exception and an error message will be displayed to the user. -
User provides a valid
returncommand input with a validTRANSACTION_IDandRETURN_TIMESTAMP, i.e.
returnTRANSACTION_IDRETURN_TIMESTAMP
If the order with the givenTRANSACTION_IDis delivered, it will be converted to an existing order with the givenTRANSACTION_IDinto a return order with the updatedRETURN_TIMESTAMP.
This return order will then be added into the return order list. -
User provides a valid
returncommand input with all compulsory parcel attributes, i.e.
returnTRANSACTION_IDNAMEADDRESSPHONE_NUMBEREMAILRETURN_TIMESTAMPWAREHOUSE_LOCATION[COMMENTS][ITEM_TYPE]
If the givenTRANSACTION_IDdoes not exist as an order or return order, this will create a new return order based on the given parcel attributes and the resulting return order will be added to the return order list.
If the givenreturnTRANSACTION_IDalready exists as an order or return order, an error message will be displayed to the user that an order or return order already exists in the order list or return order list respectively. -
User provides a valid
returncommand input with an invalidTRANSACTION_ID
This will result in a parse exception and an error message will be displayed to the user. -
User provides a valid
returncommand but one or more of the compulsory parcel attributes is/are invalid. This will result in a parse exception and an error message will be displayed to the user.
Structure of Return Command
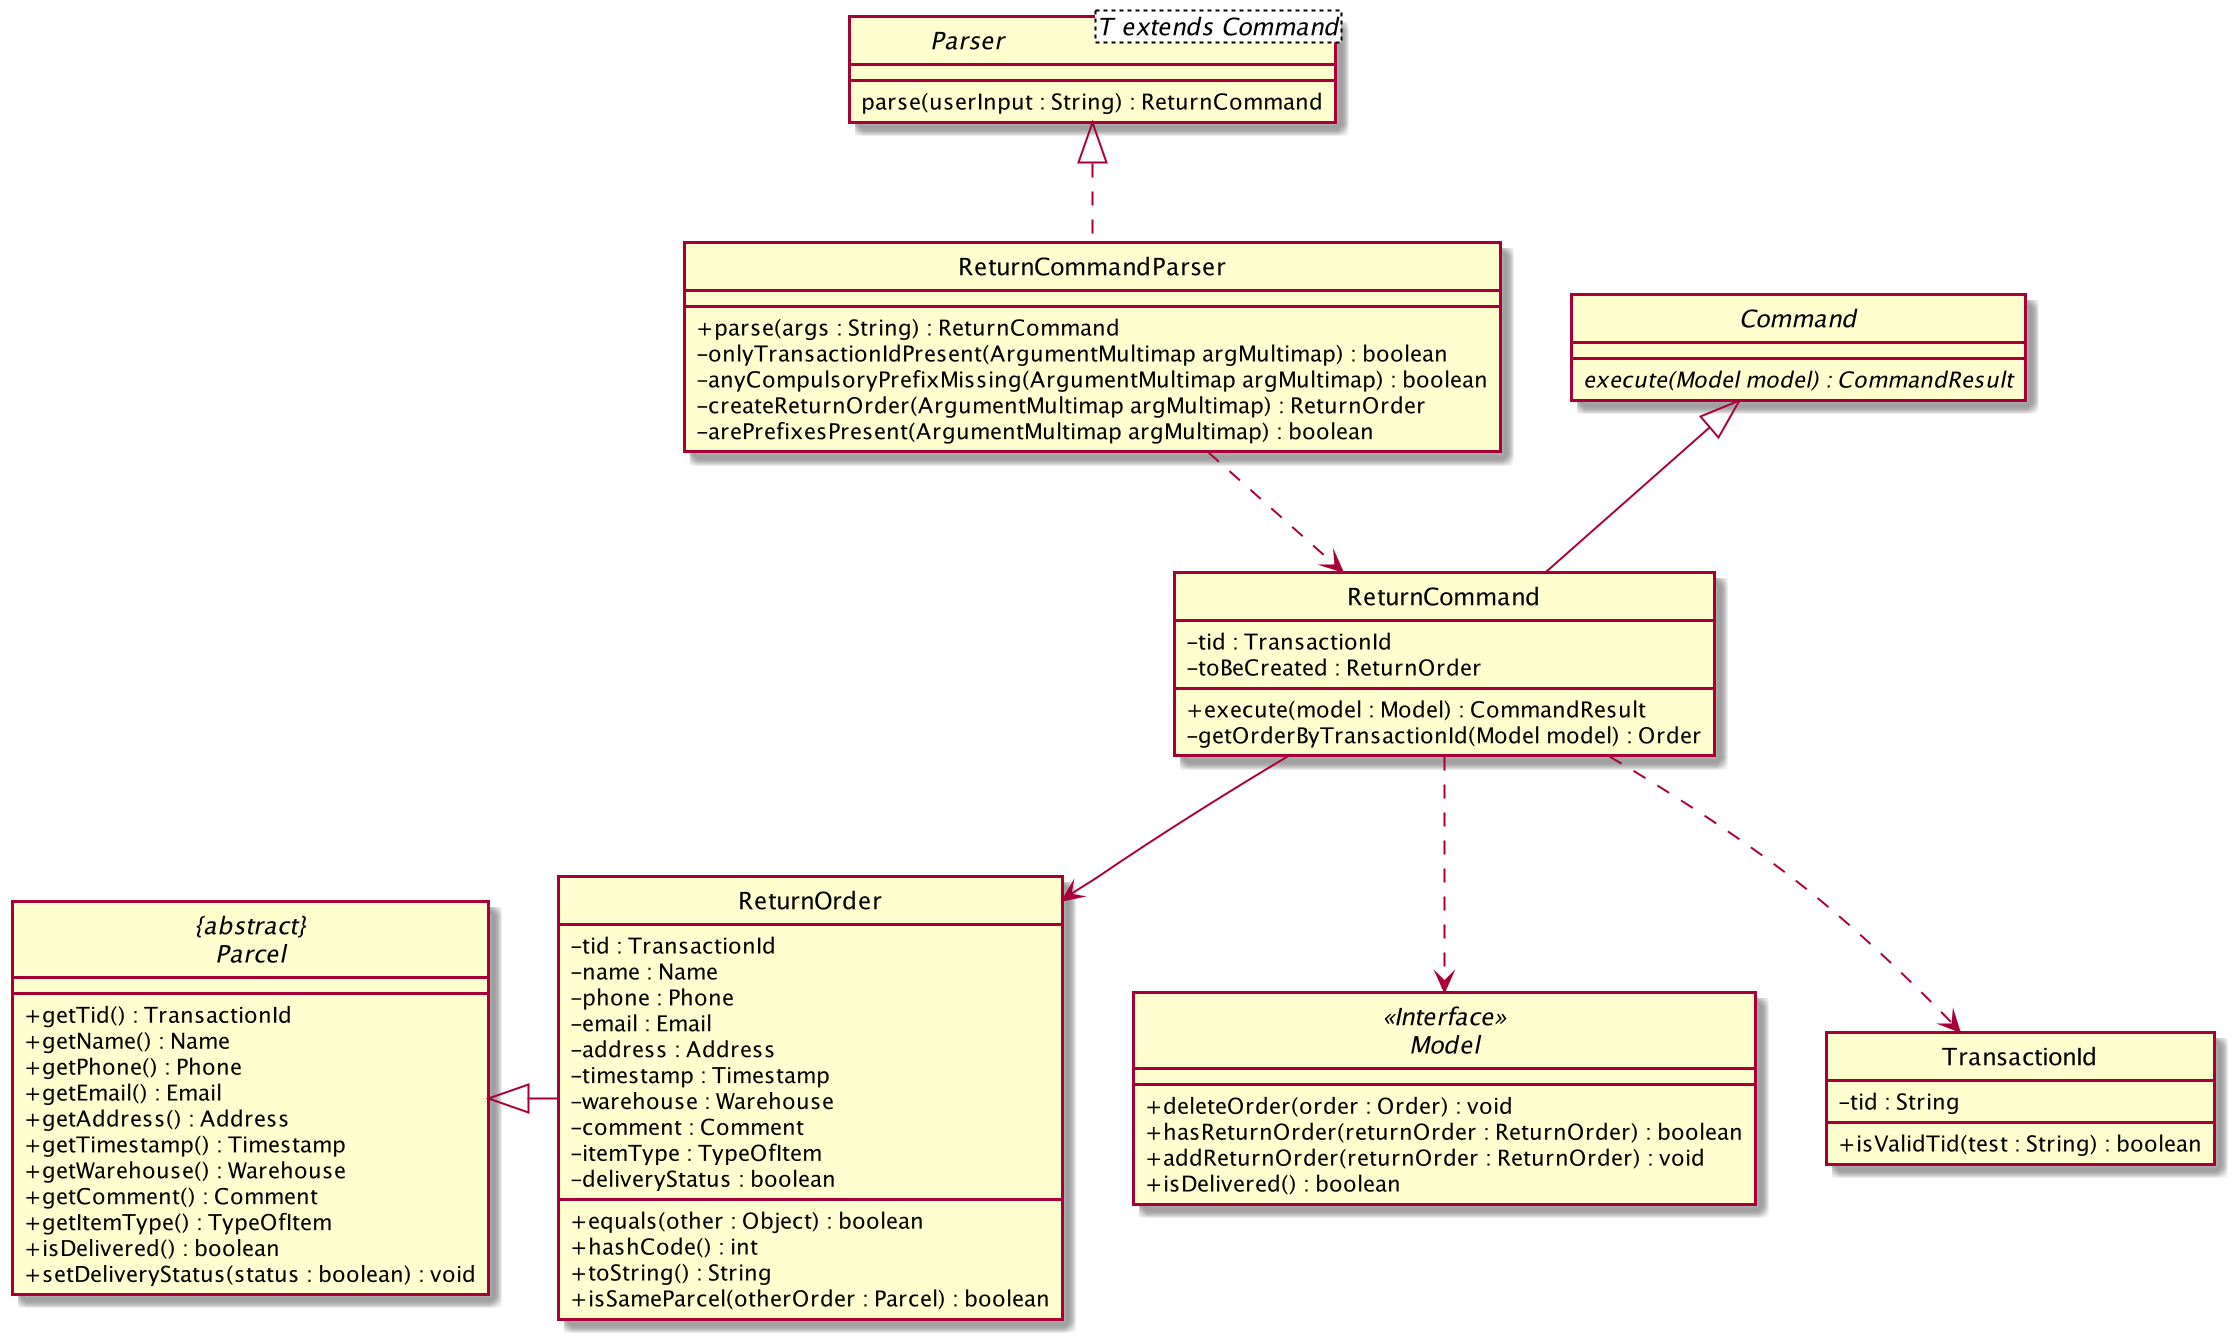
The above class diagram shows the structure of the ReturnCommand and its associated classes and interfaces. Some methods and fields are not included because they are not extensively utilised in ReturnCommand; such as public static fields and getter/setter methods.
Interactions between objects when Return Command is executed
The sequence diagrams for the Return Command are shown below.
The sequence diagram for converting an order into a return order are shown below.

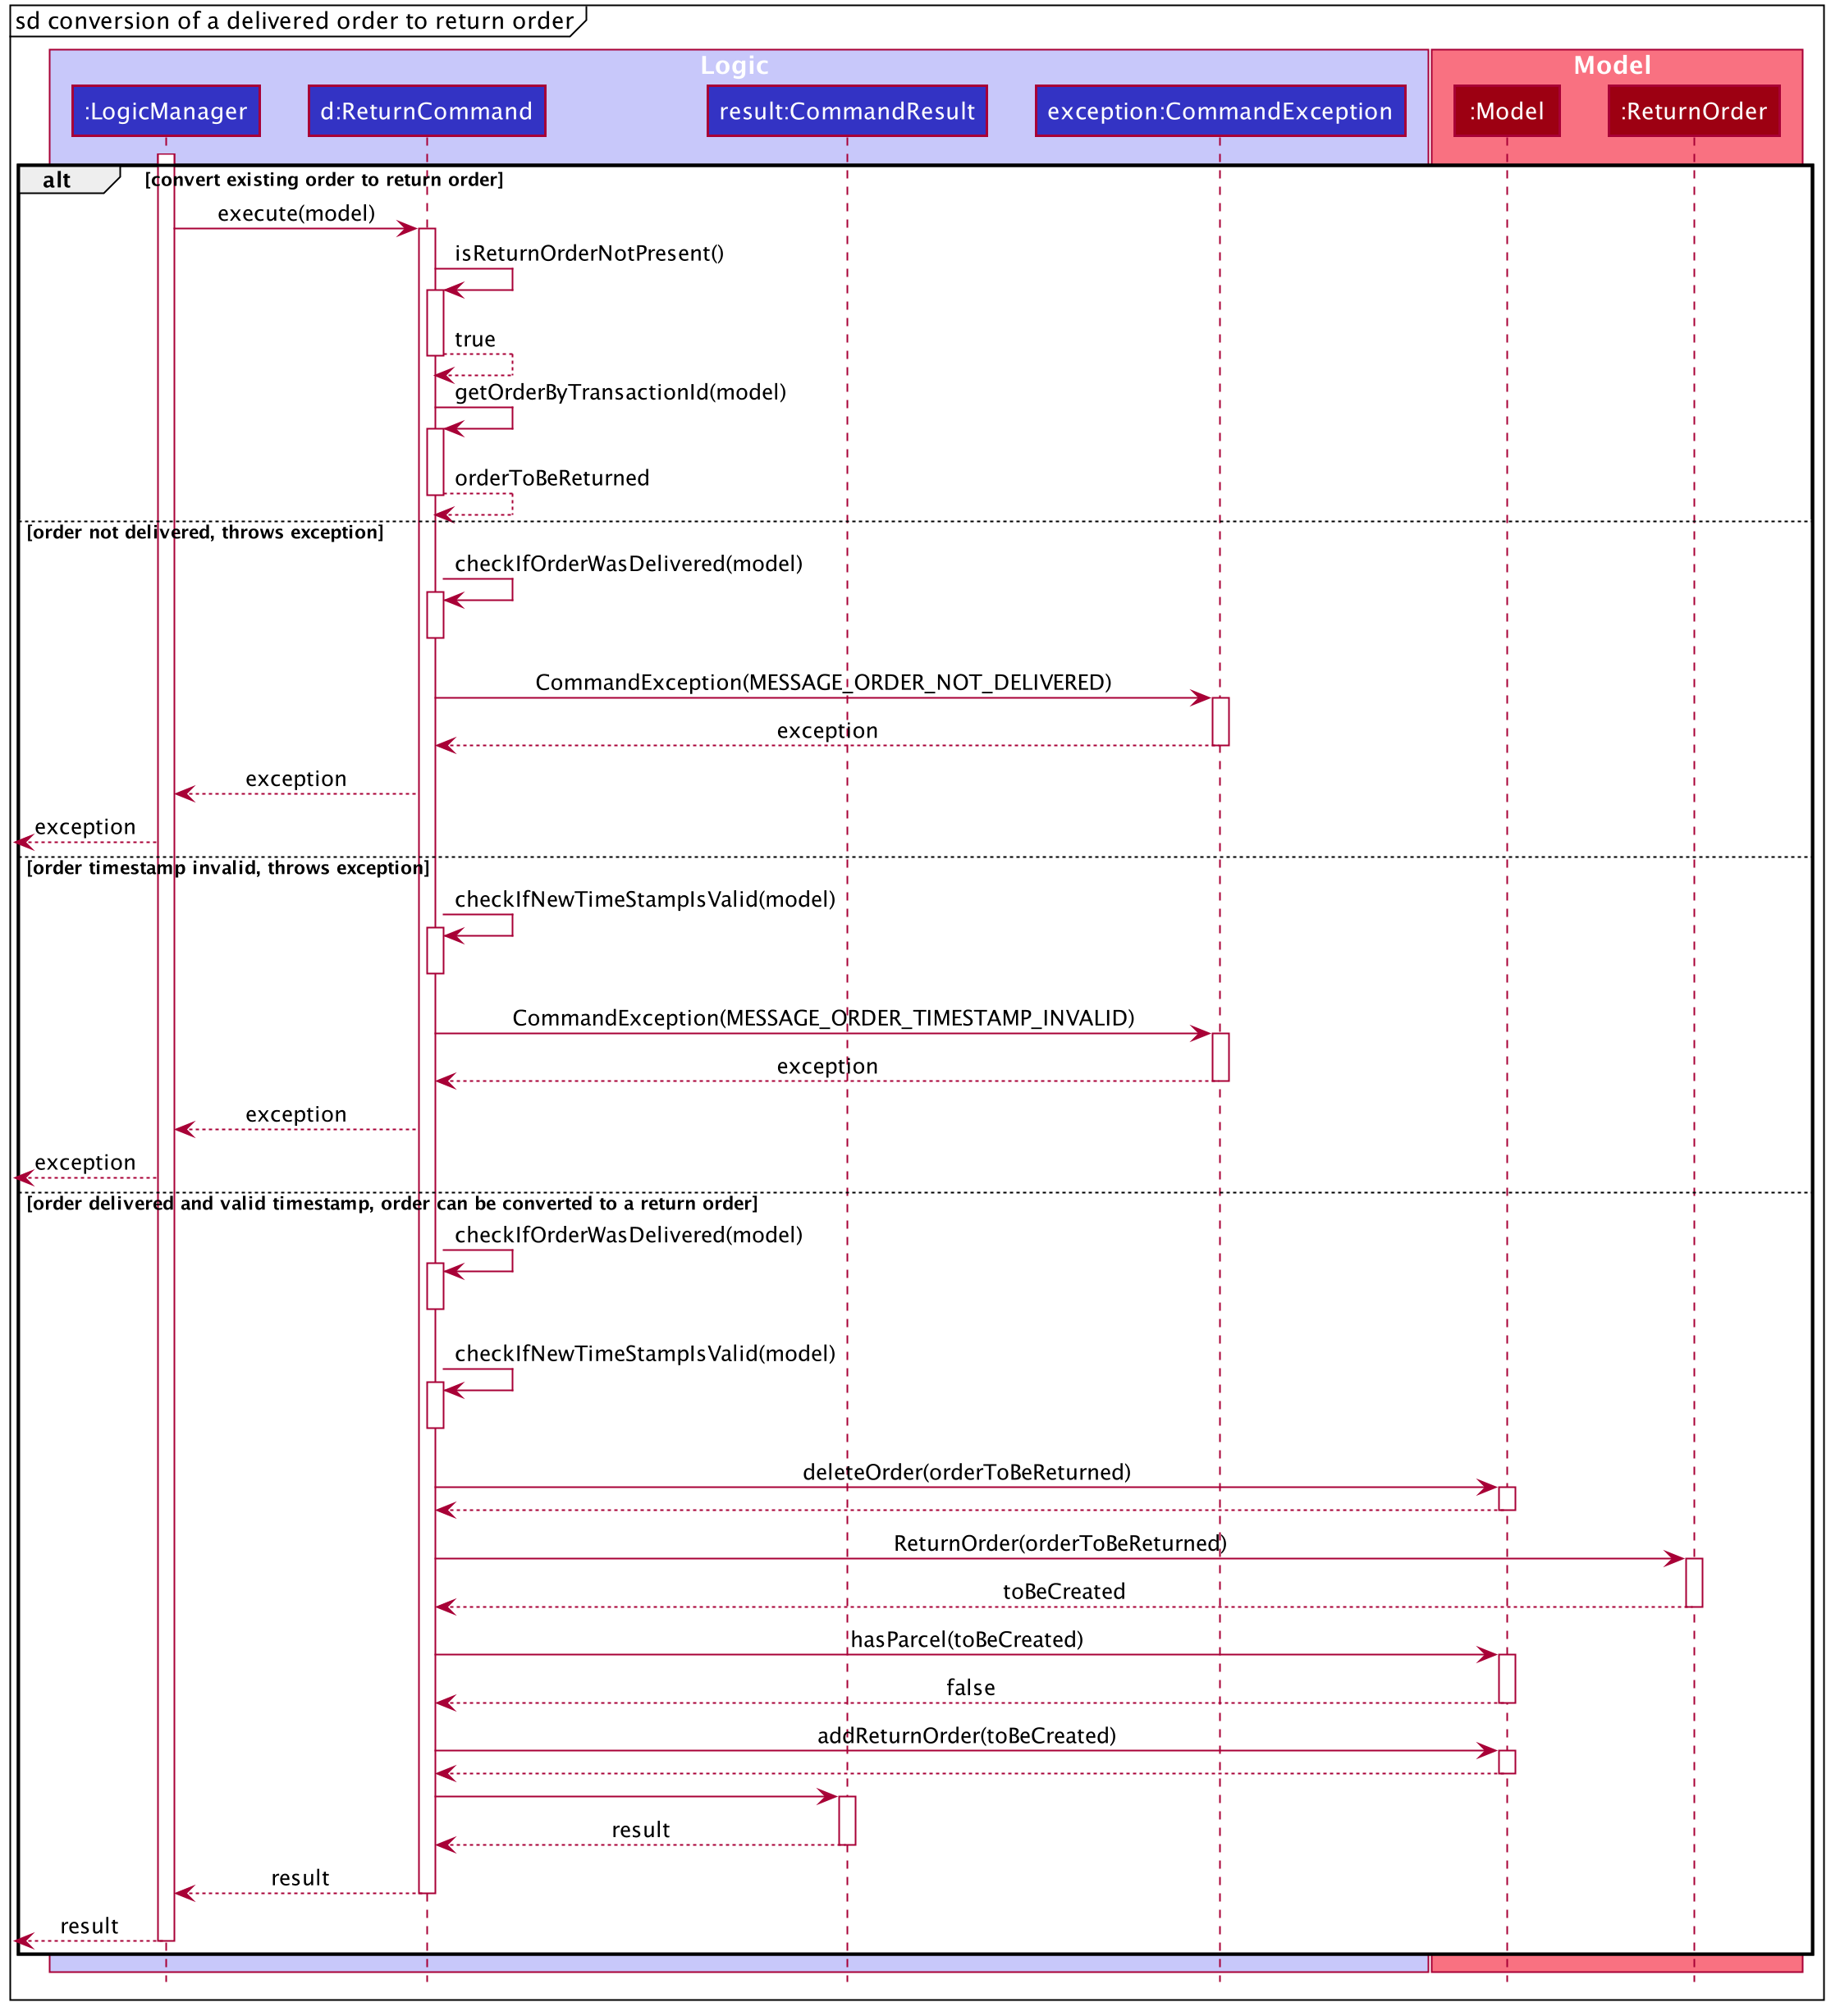
The arguments typed into Delino by the user will first be done by the execute
method in LogicManager. After which, an DelinoParser object will be created to parse
the input which is determined by the command word via the parseCommand method. In this case, it is the
return command word that will be parsed.
Then, a ReturnCommandParser object will be created to parse the arguments after removing
the command word return from the user’s input. Based on the command word return,
a ReturnCommand object will be created.
Subsequently, the parseCommand method in LogicManager will continue to create a CommandResult
based on the validity of the user’s input; which is determined by the execute method in
ReturnCommand.
The execute method of ReturnCommand will first check if the return order in the constructor of
ReturnCommand is present. In this case, since we are converting an order into a return order,
the return order will not be present in the constructor of ReturnCommand and
the isReturnOrderNotPresent() method will return true.
If the given TRANSACTION_ID exists in the order list, the
getOrderByTransactionId(model) method will attempt to create a new Order object from
the model’s Order list based on the given transaction ID, i.e. orderToBeReturned.
The checkIfOrderWasDelivered(model) method checks if the newly created Order is delivered. If the order was not
delivered, it will throw a command exception and display an error message to the user.
If the order was delivered, Delino will proceed to check if the timestamp input was valid. If it was invalid, an exception will be thrown and an error message will be displayed to the user.
If the order was delivered and the timestamp input was valid,
the deleteOrder(orderToBeReturned) method will be triggered to delete the order from the model’s order list. Also, a new return order will be created based
on the ReturnOrder’s constructor that takes in an Order, i.e. ReturnOrder(orderToBeReturned). This
creates a new Return Order object, toBeCreated.
Subsequently, this newly created ReturnOrder object toBeCreated, will be checked against the
model’s return order list using the hasParcel(toBeCreated) method. If it exists, a command exception will be thrown
and an error message will be displayed to the user.
If the ReturnOrder does not exist in the model’s return order list, the newly created ReturnOrder object,
toBeCreated, will be added to the model’s return order list using the addReturnOrder(toBeCreated) method.
Finally, a new CommandResult will be created to display the success message to the user for converting a delivered order to a return order.
The sequence diagram for creating a new return order are shown below.

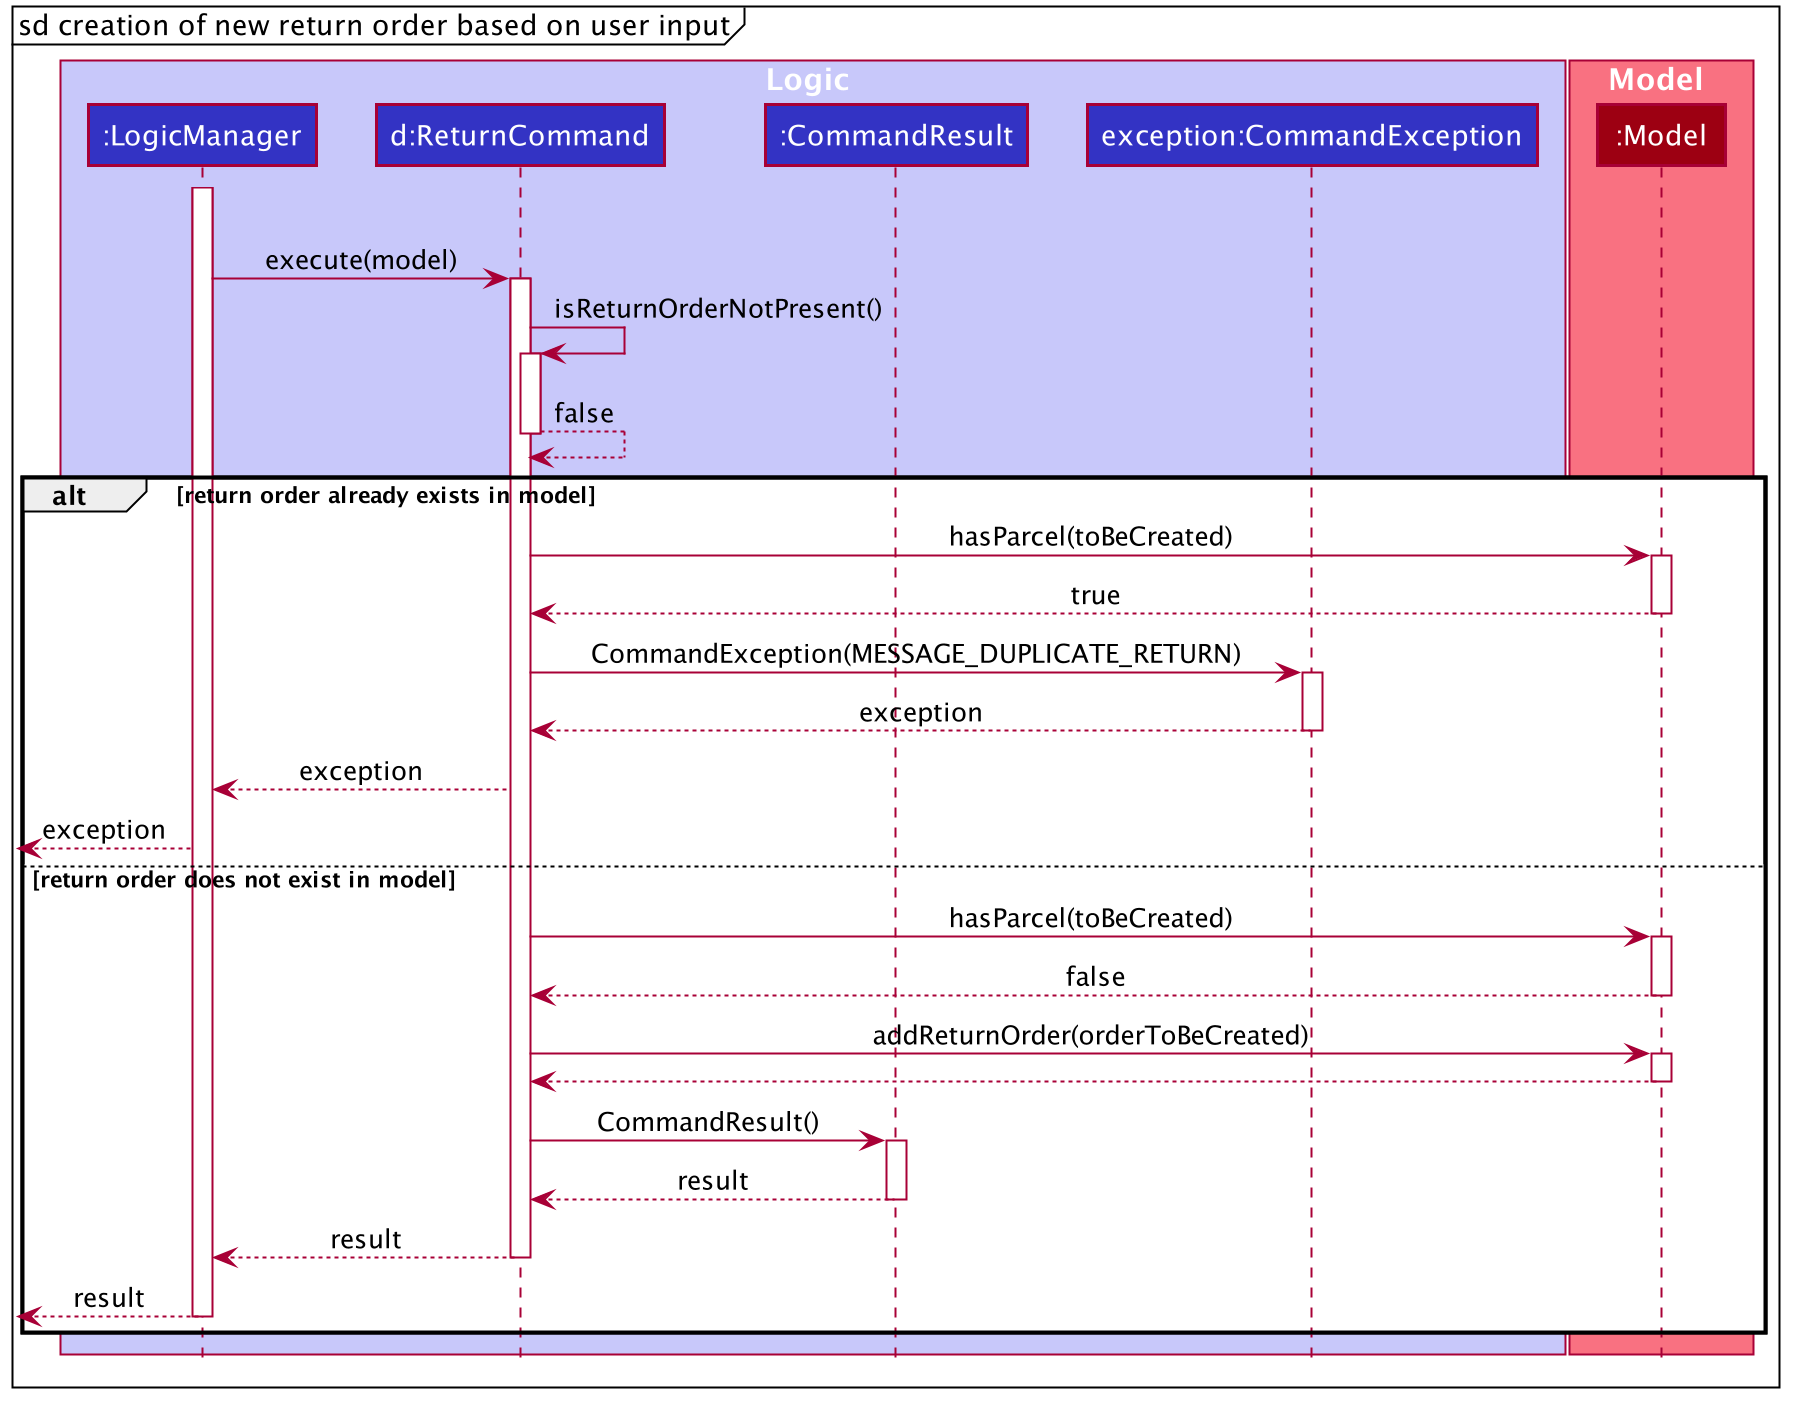
The arguments typed into Delino by the user will first be done by the execute
method in LogicManager. After which, an DelinoParser object will be created to parse
the input which is determined by the command word via the parseCommand method. In this case, it is the
return command word that will be parsed.
Then, a ReturnCommandParser object will be created to parse the arguments after removing
the command word return from the user’s input. Based on the command word return,
a ReturnCommand object will be created.
Subsequently, the parseCommand method in LogicManager will continue to create a CommandResult
based on the validity of the user’s input; which is determined by the execute method in
ReturnCommand.
The execute method of ReturnCommand will first check if the return order in the constructor of
ReturnCommand is present. In this case, since we are creating a new return order from the given parcel attributes, a
return order will be created and it will be used in the constructor of ReturnCommand and
the isReturnOrderNotPresent() method will return false.
Also, a new return order will be created based on the ReturnOrder's constructor
that takes in an Order, i.e. ReturnOrder(orderToBeReturned). This
creates a new ReturnOrder object, toBeCreated.
Subsequently, this newly created ReturnOrder object toBeCreated, will be checked against the
model’s return order list using the hasParcel(toBeCreated) method.
If it exists, a command exception will be thrown
and an error message will be displayed to the user.
If the ReturnOrder does not exist in the model’s return order list, the newly created ReturnOrder object,
toBeCreated, will be added to the model’s return order list using the addReturnOrder(toBeCreated) method.
Finally, a new CommandResult will be created to display the success message to the user for creating a new return order with the given parcel attributes. This whole section on the Help feature can be found at here. This link is provided in the event if some of the cross links are not working, as they refer to documents done by another team member.
Help Feature
In this section, the functionality of the help feature,
the expected execution path, the structure
of the HelpCommand class and the interactions
between objects with the HelpCommand object will be discussed.
What is the Help Feature
The help feature was implemented as the HelpCommand in the logic package.
The help feature allows users to save the trouble of adding the delivery orders and the return orders one by one
when they have large amount of delivery orders or return orders to add into Delino.
Execution paths of the Help command
The execution path of the HelpCommand is shown below:
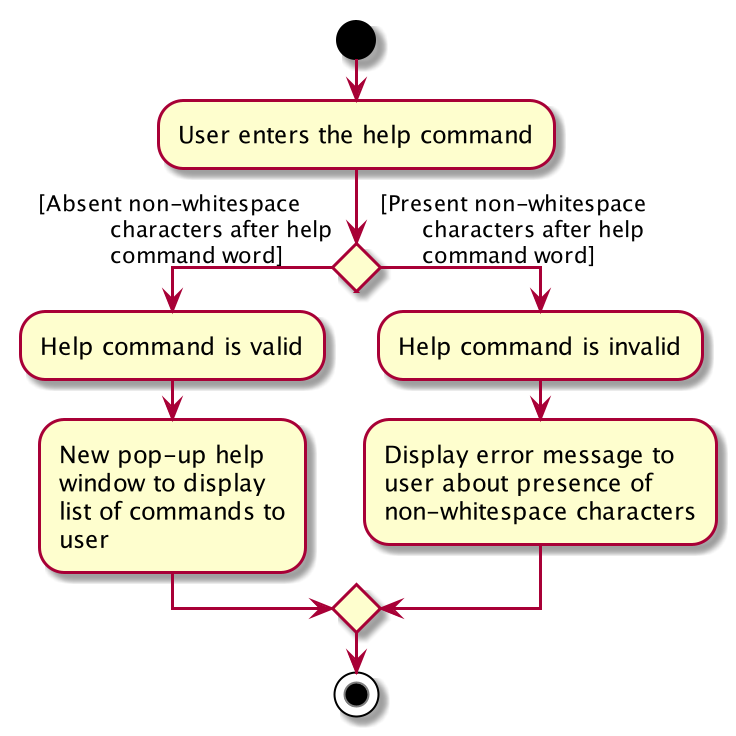
After the user enters the help command word, there will be a validation check to ensure that there are no
non-whitespace characters following after the help command word so that the help command can
be processed as a valid command.
If there are non-whitespace characters following help command word, a ParseException object will
be created and thrown to the user by displaying an error message.
If there are no non-whitespace characters following the help command word, a new HelpCommand object
will be created and a CommandResult object will be created subsequently to display the success message
to the user.
Structure of Help Command
The following diagram shows the overview structure of the HelpCommand Class Diagram:
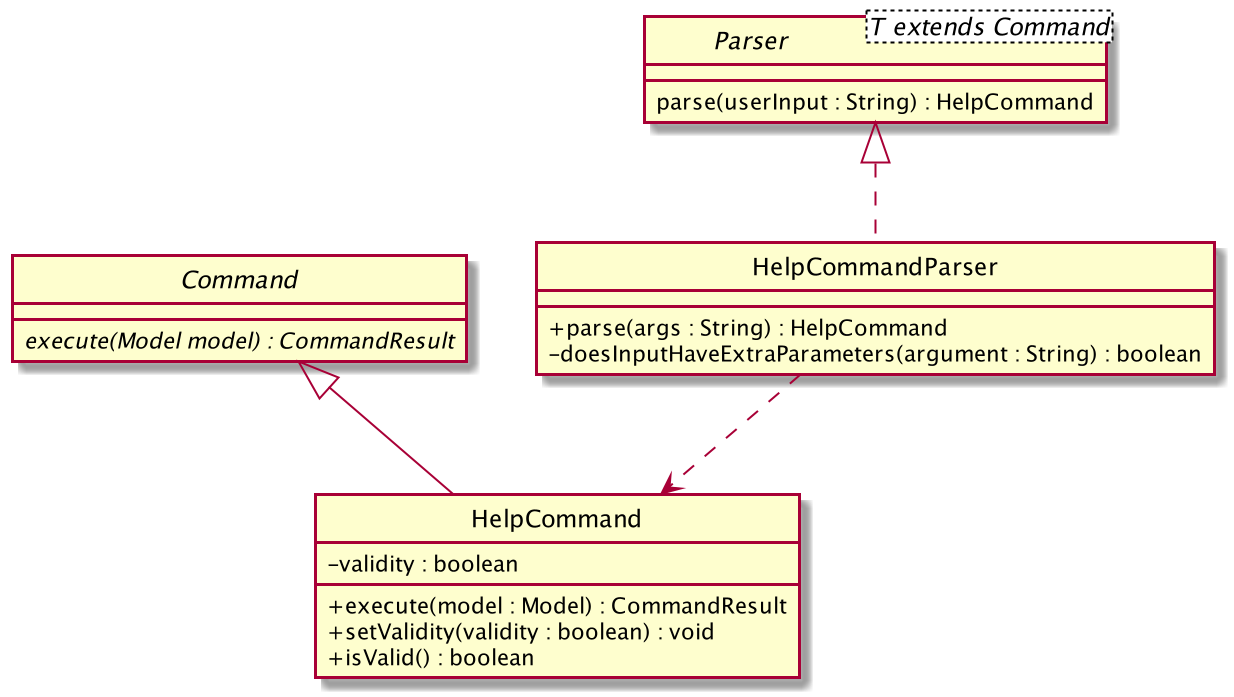
The above class diagram shows the structure of the HelpCommand and its associated classes and interfaces. Some methods and fields are not included because they are not extensively utilised in HelpCommand; such as public static fields and getter/setter methods.
Interactions between objects when Help Command is executed
The sequence diagrams for the help command are shown below.
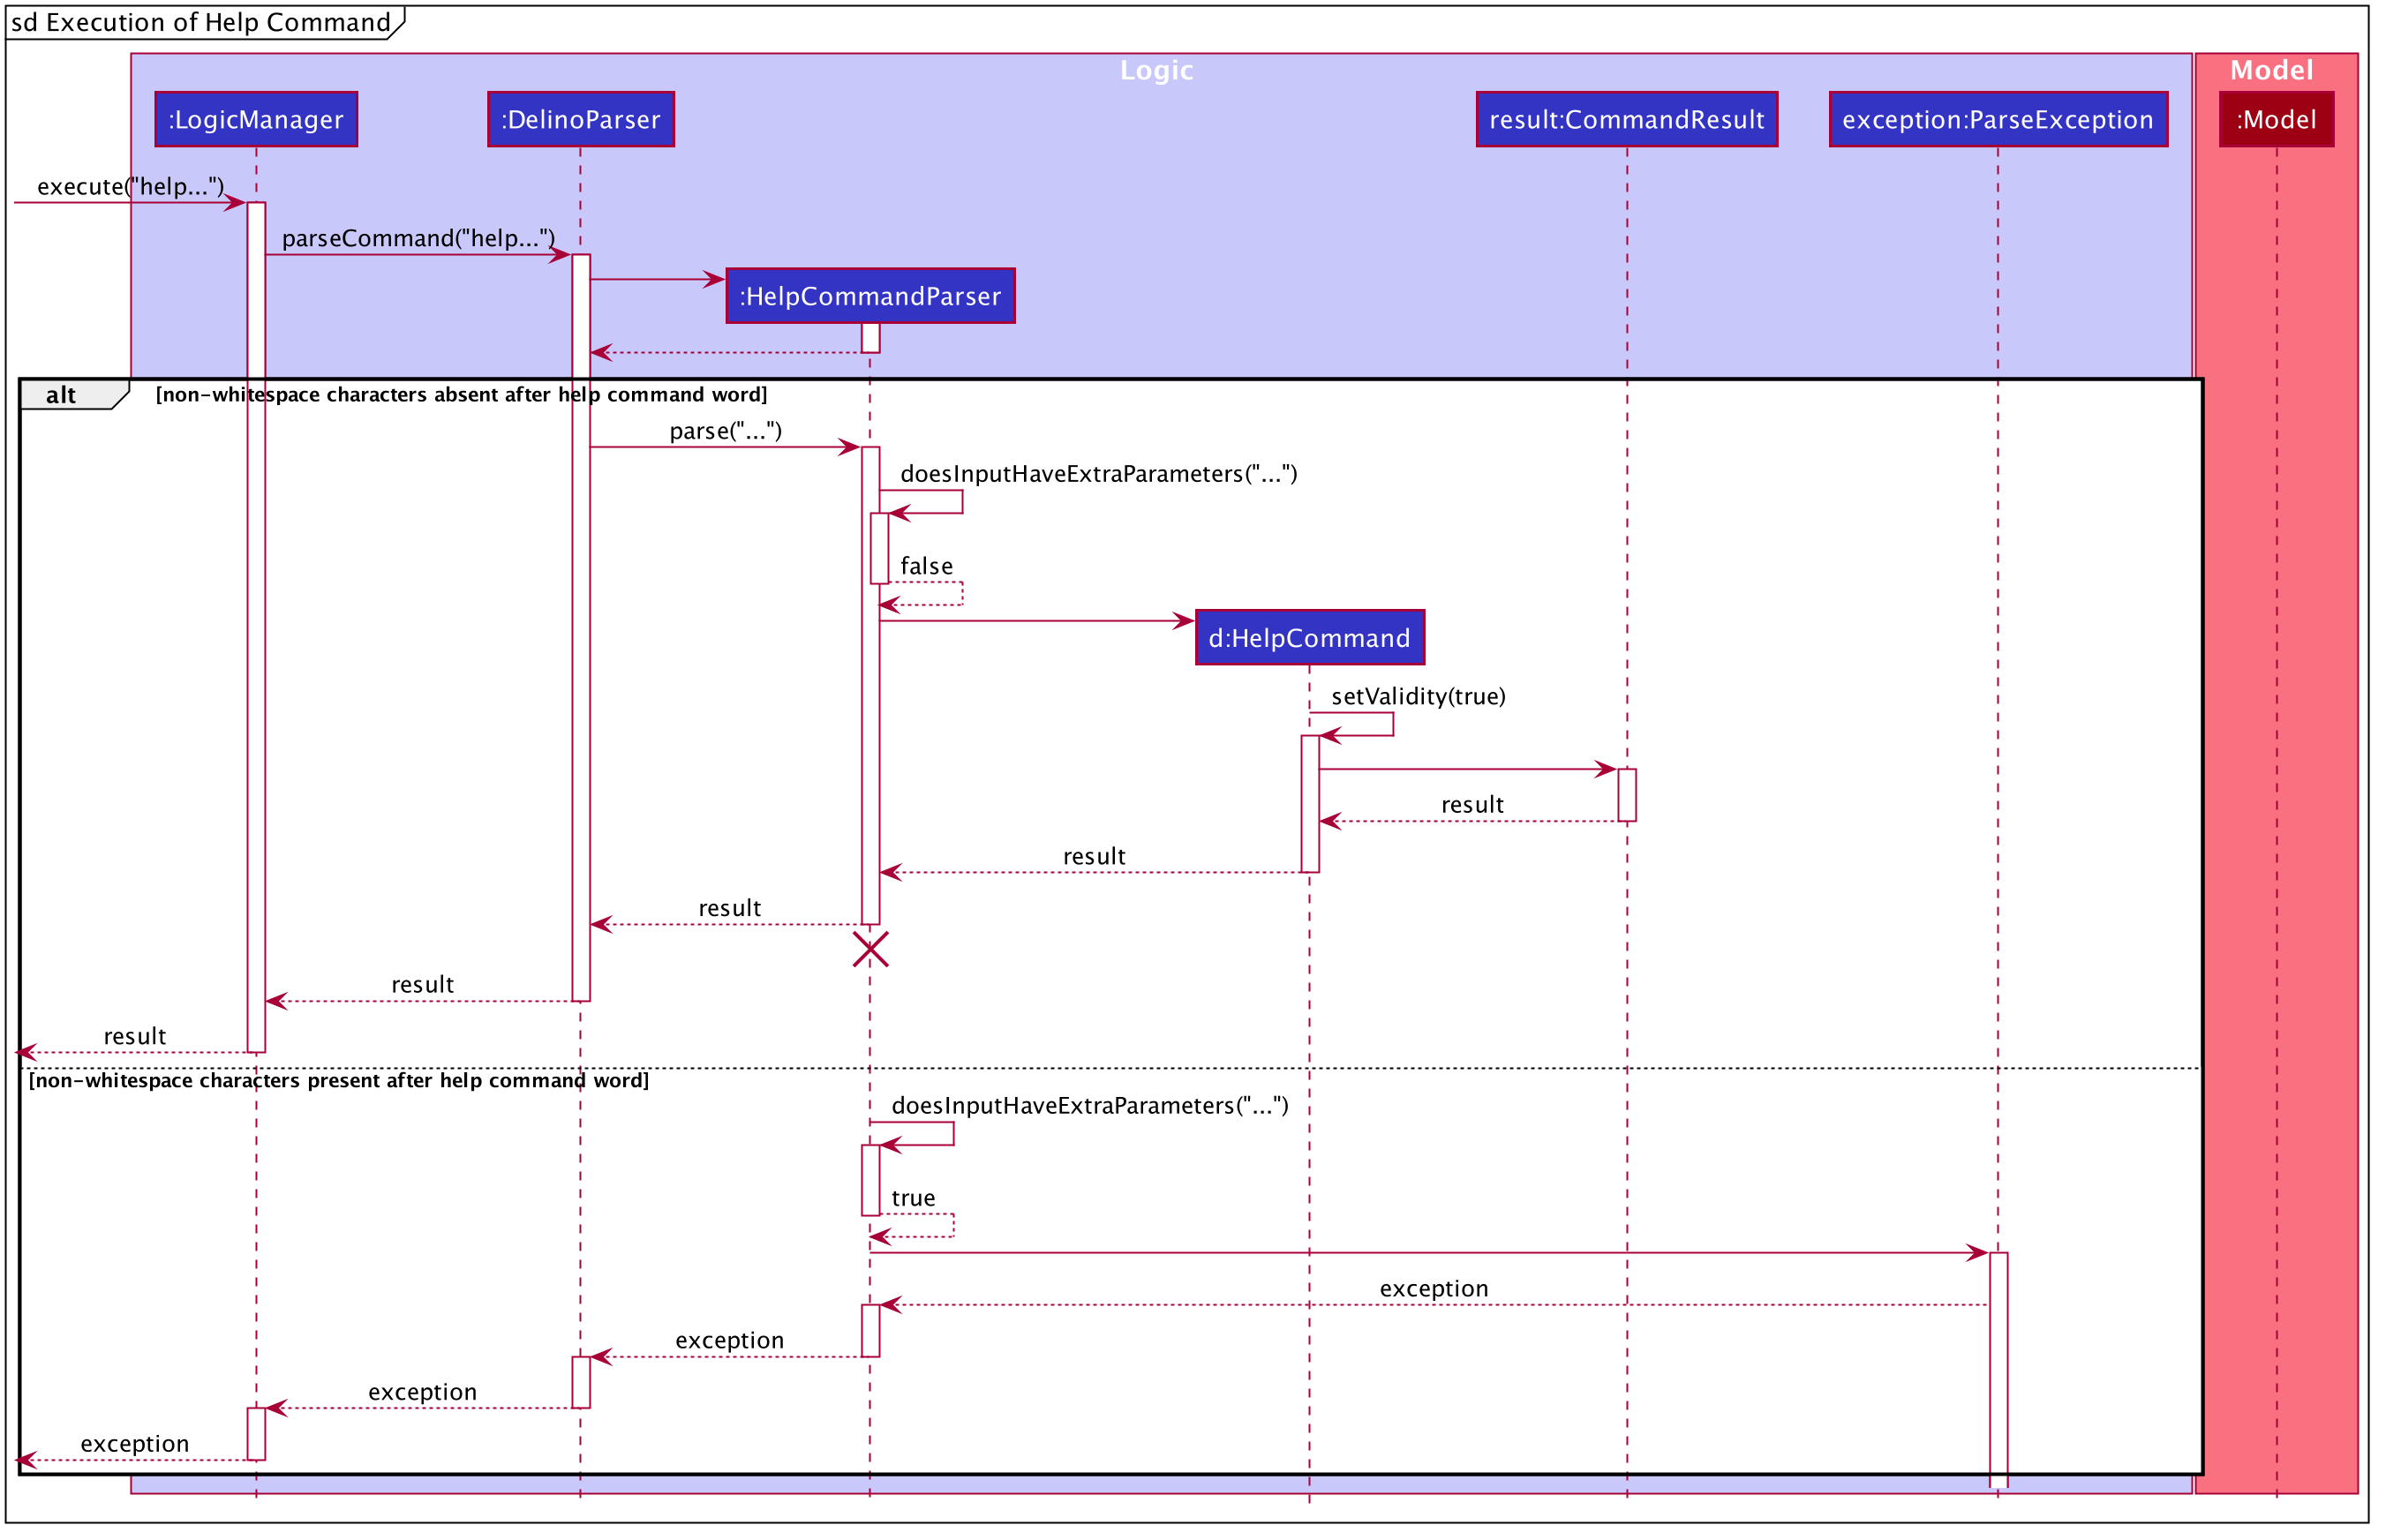
The arguments typed into Delino by the user will first be done by the execute
method in LogicManager. After which, an DelinoParser object will be created to parse
the input which is determined by the command word via the parseCommand method. In this case, it is the
return command word that will be parsed.
Then, a HelpCommandParser object will be created to parse the arguments after removing
the command word help from the user’s input. Based on the command word help,
a HelpCommand object will be created. The parse() method in HelpCommand will
check the validity of the user’s input to see if there are any non-whitespace characters following
the help command word.
Subsequently, the parseCommand method in LogicManager will continue to create a CommandResult
based on the validity of the user’s input.
If the user input is invalid, i.e. there are non-whitespace characters after the help command word,
a ParseException object will be created in the parse method in HelpCommandParser
and an error message will be displayed to the user.
If the user input is valid, i.e. there are no non-whitespace characters after the help command word,
the parse method of HelpCommandParser will return a new HelpCommand.
Then, a new CommandResult will be created based on the user input. This will then display the success message to the user. This whole section on the Delivered feature can be found at here. This link is provided in the event if some of the cross links are not working, as they refer to documents done by another team member.
Delivered Feature
In this section, the functionality of the delivered feature, the
expected execution path,
the structure of the DeliveredCommand class and the interactions
between objects with the DeliveredCommand will be discussed.
What is the Delivered feature
The delivered function allows the user to mark orders or return orders
as delivered after delivering an order or a return order.
The delivered feature was implemented as the DeliveredCommand in the logic package.
The delivered function requires a valid FLAG and a valid INDEX.
i.e. delivered INDEX FLAG
The FLAG can either be '-o' or '-r', which indicates which list
(order list or return order list respectively) to mark the parcel from. The FLAG is
only valid when either '-o' and '-r' is used. All other inputs will be regarded as invalid.
The INDEX is a positive integer that determines
which order or return order to be marked as delivered. The INDEX is only valid if
it is a positive integer and if it is not bigger than the size of the order list or return order list, depending
on the FLAGthat is provided. For instance, if the '-o' FLAG is provided,
the INDEX should not be greater than the size of the order list.
Execution Paths of Delivered Command
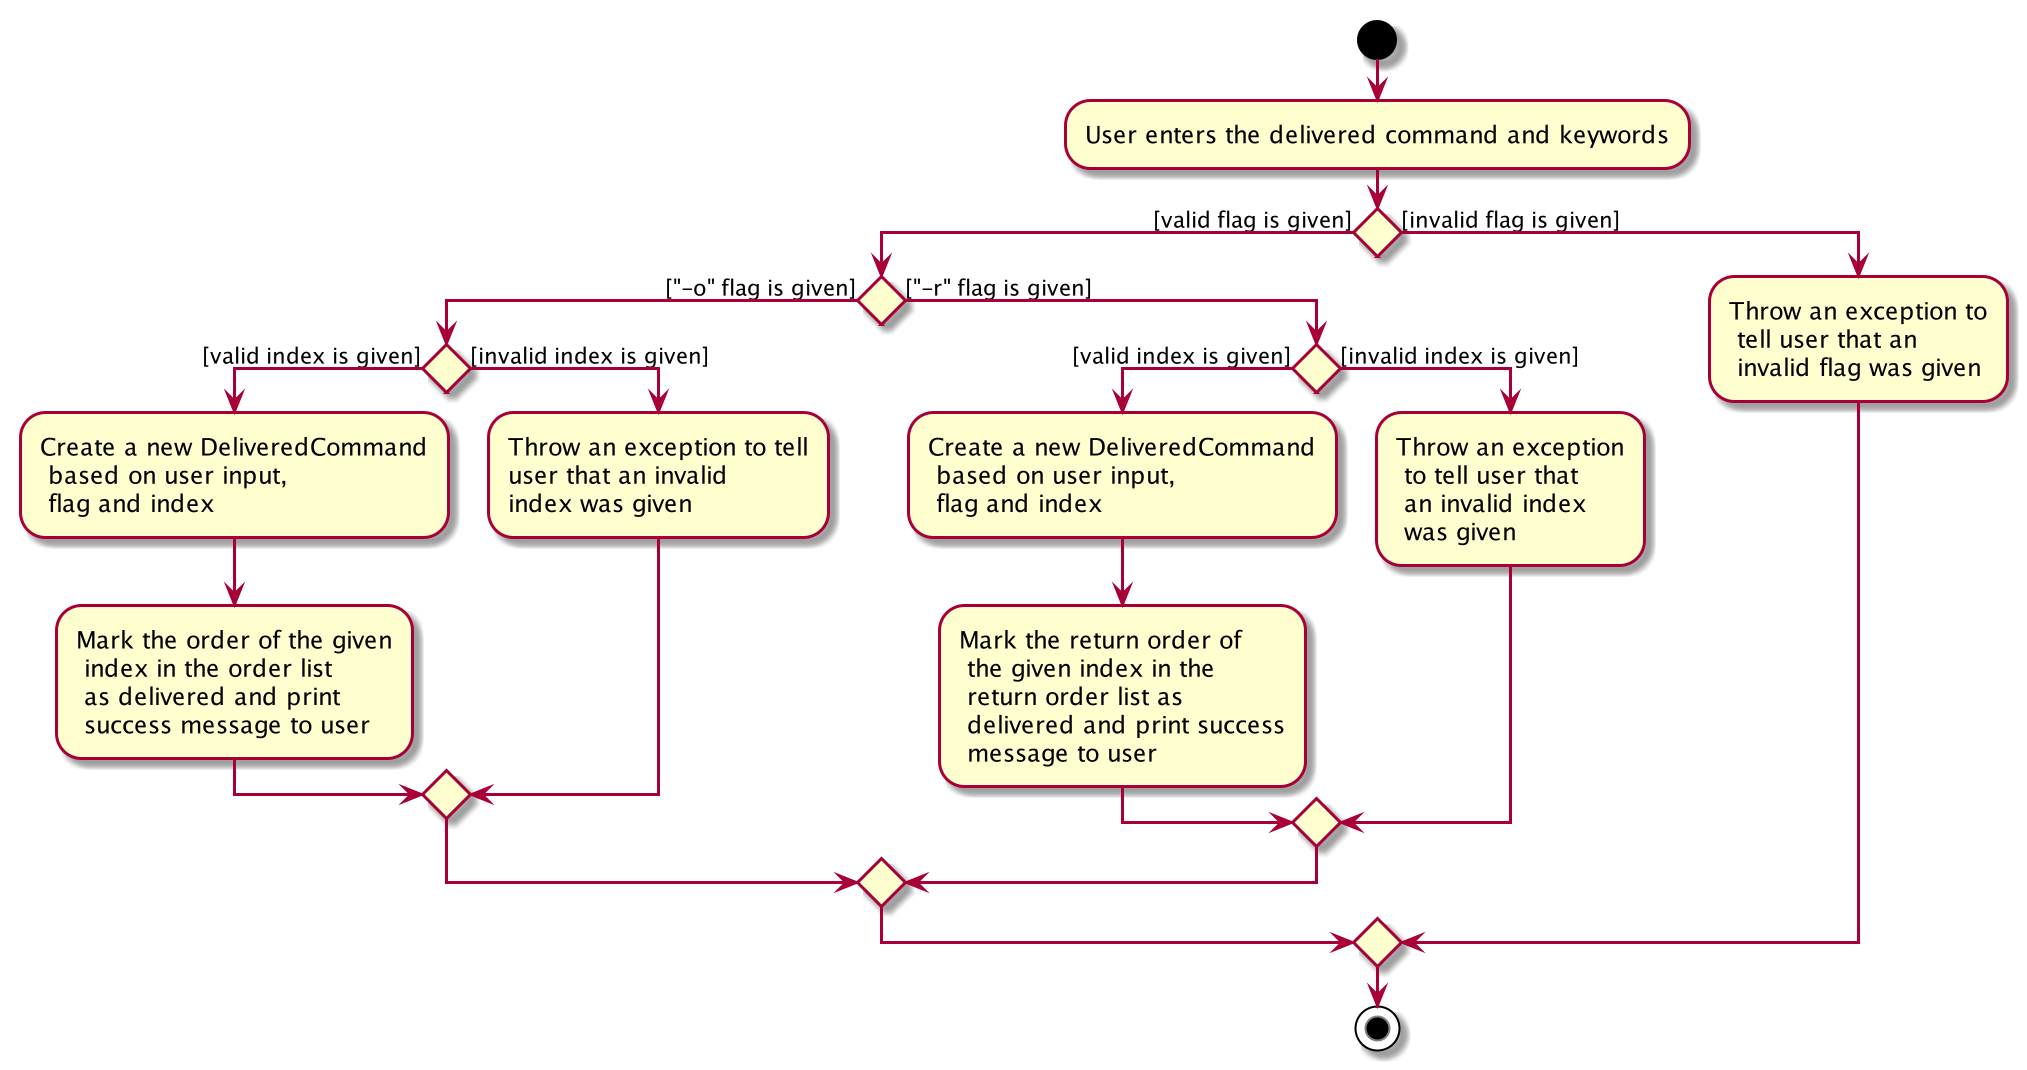
The above activity diagram shows the logic behind the DeliveredCommand which is determined in
the DeliveredCommandParser class when the user inputs the command word delivered to activate the
delivered feature.
Structure of Delivered Command
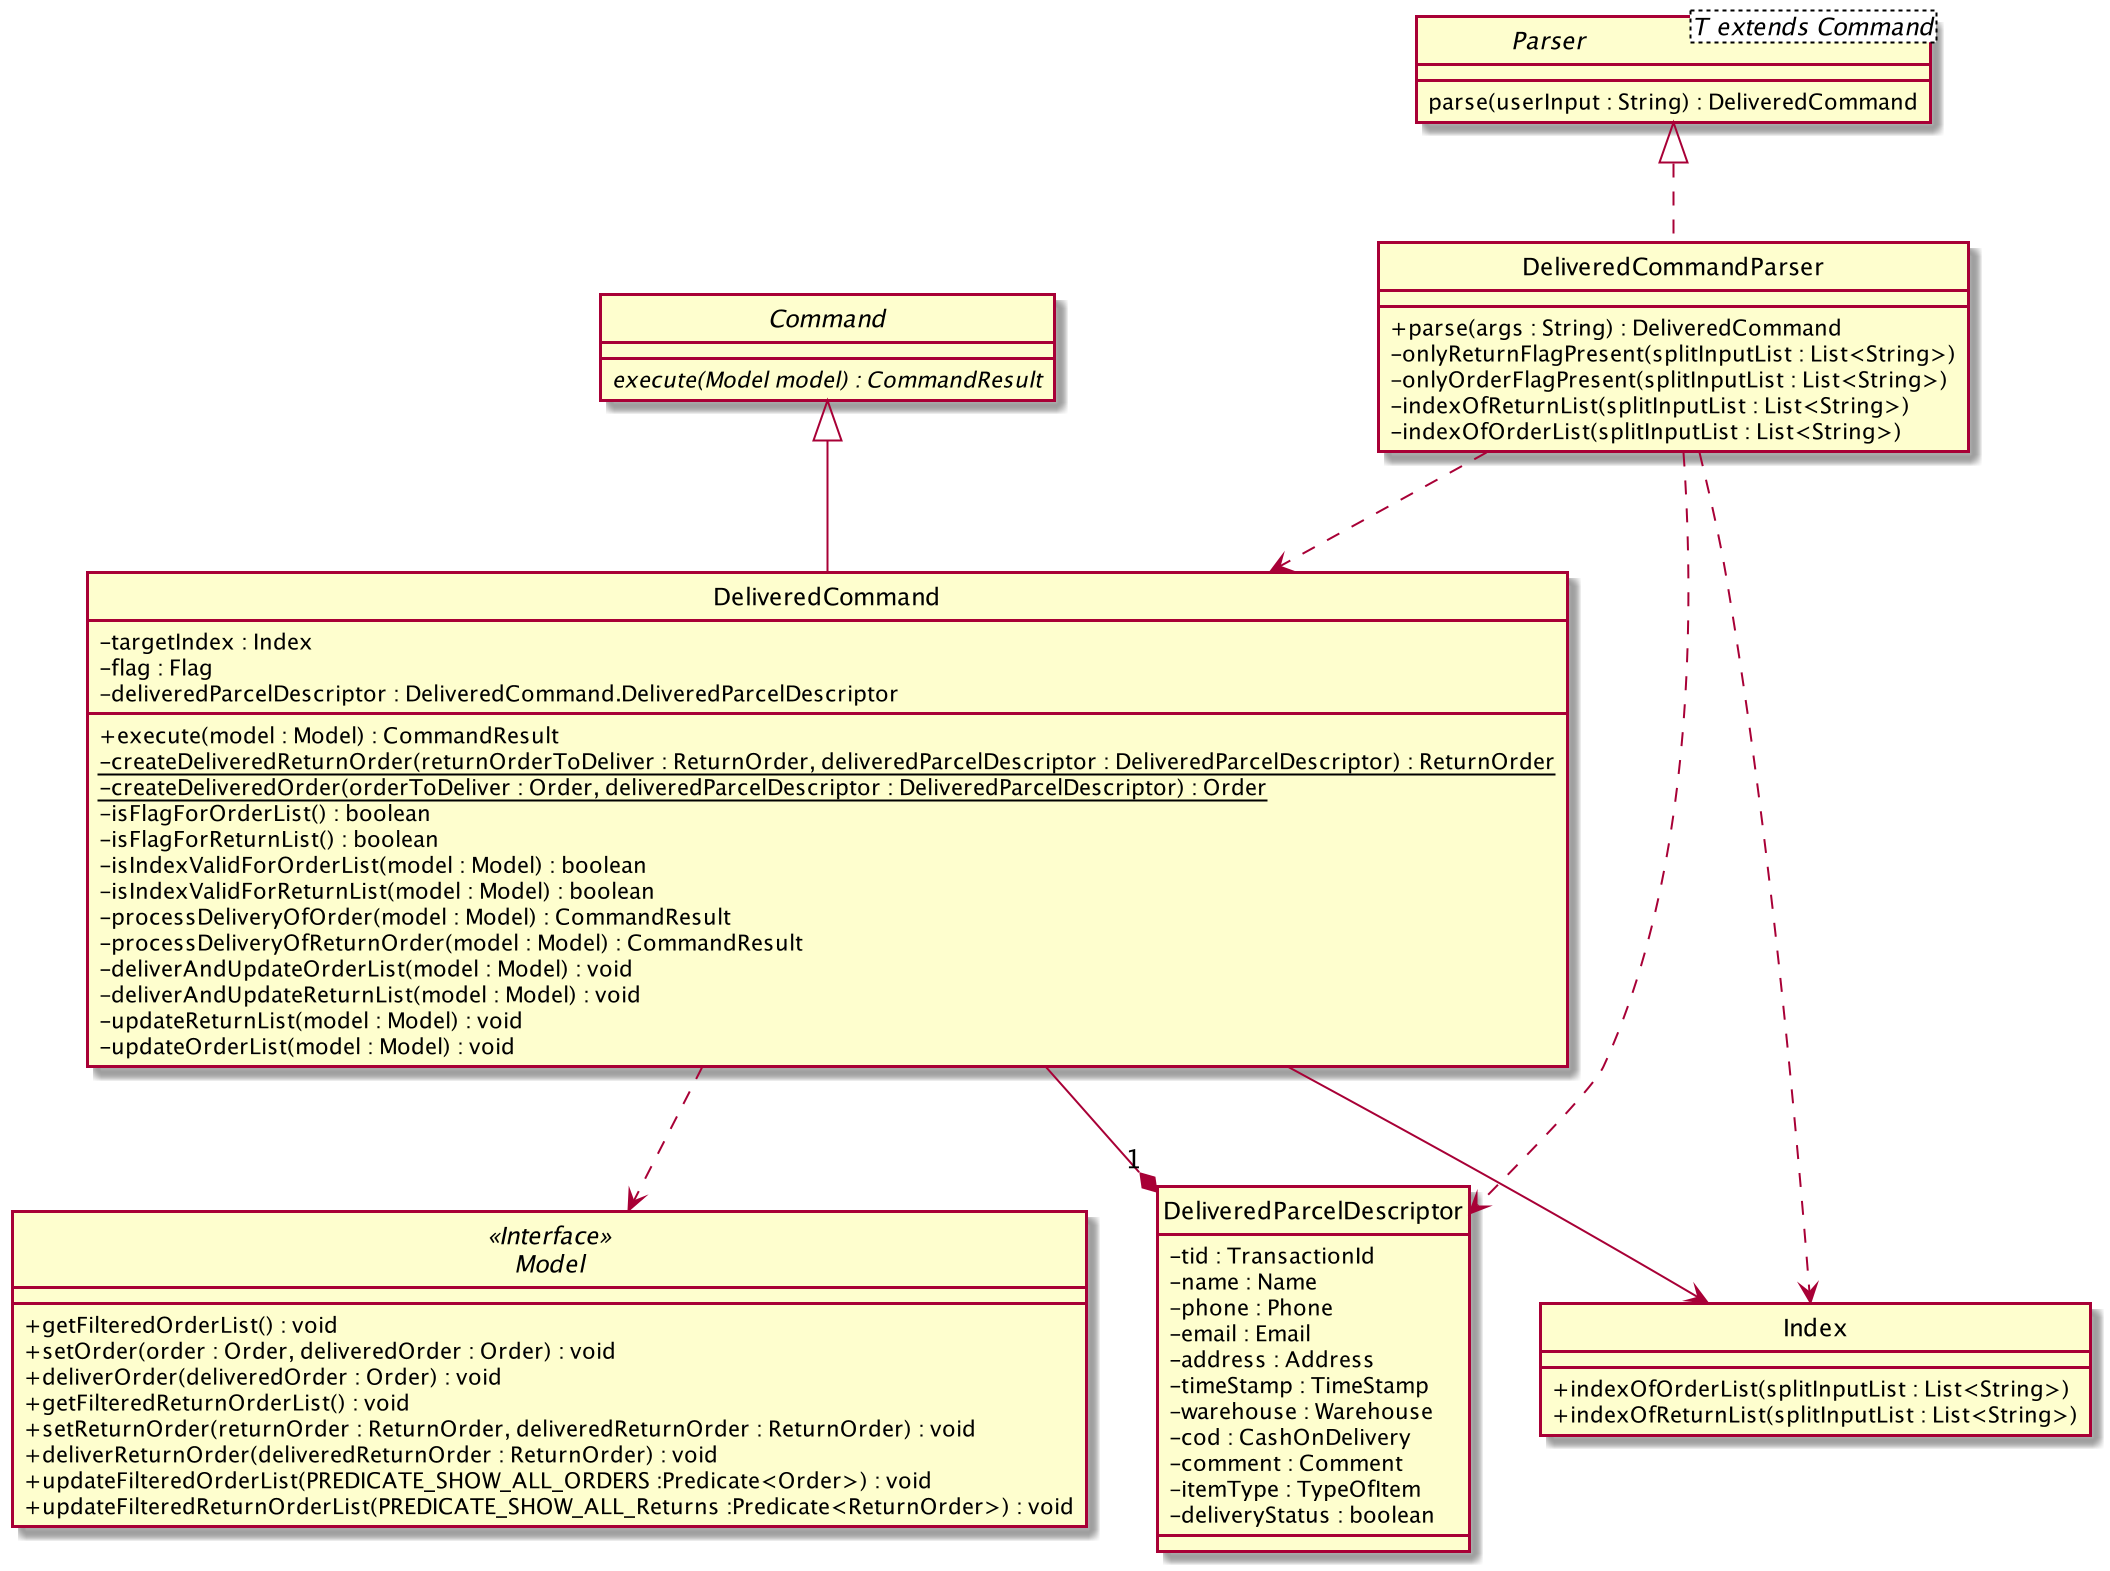
The above class diagram shows the structure of the DeliveredCommand and its associated classes and interfaces. Some methods and fields are not included because they are not extensively utilised in DeliveredCommand; such as public static fields and getter/setter methods.
Interactions between Delivered command and its associated objects
The sequence diagrams for the delivered command are shown below.
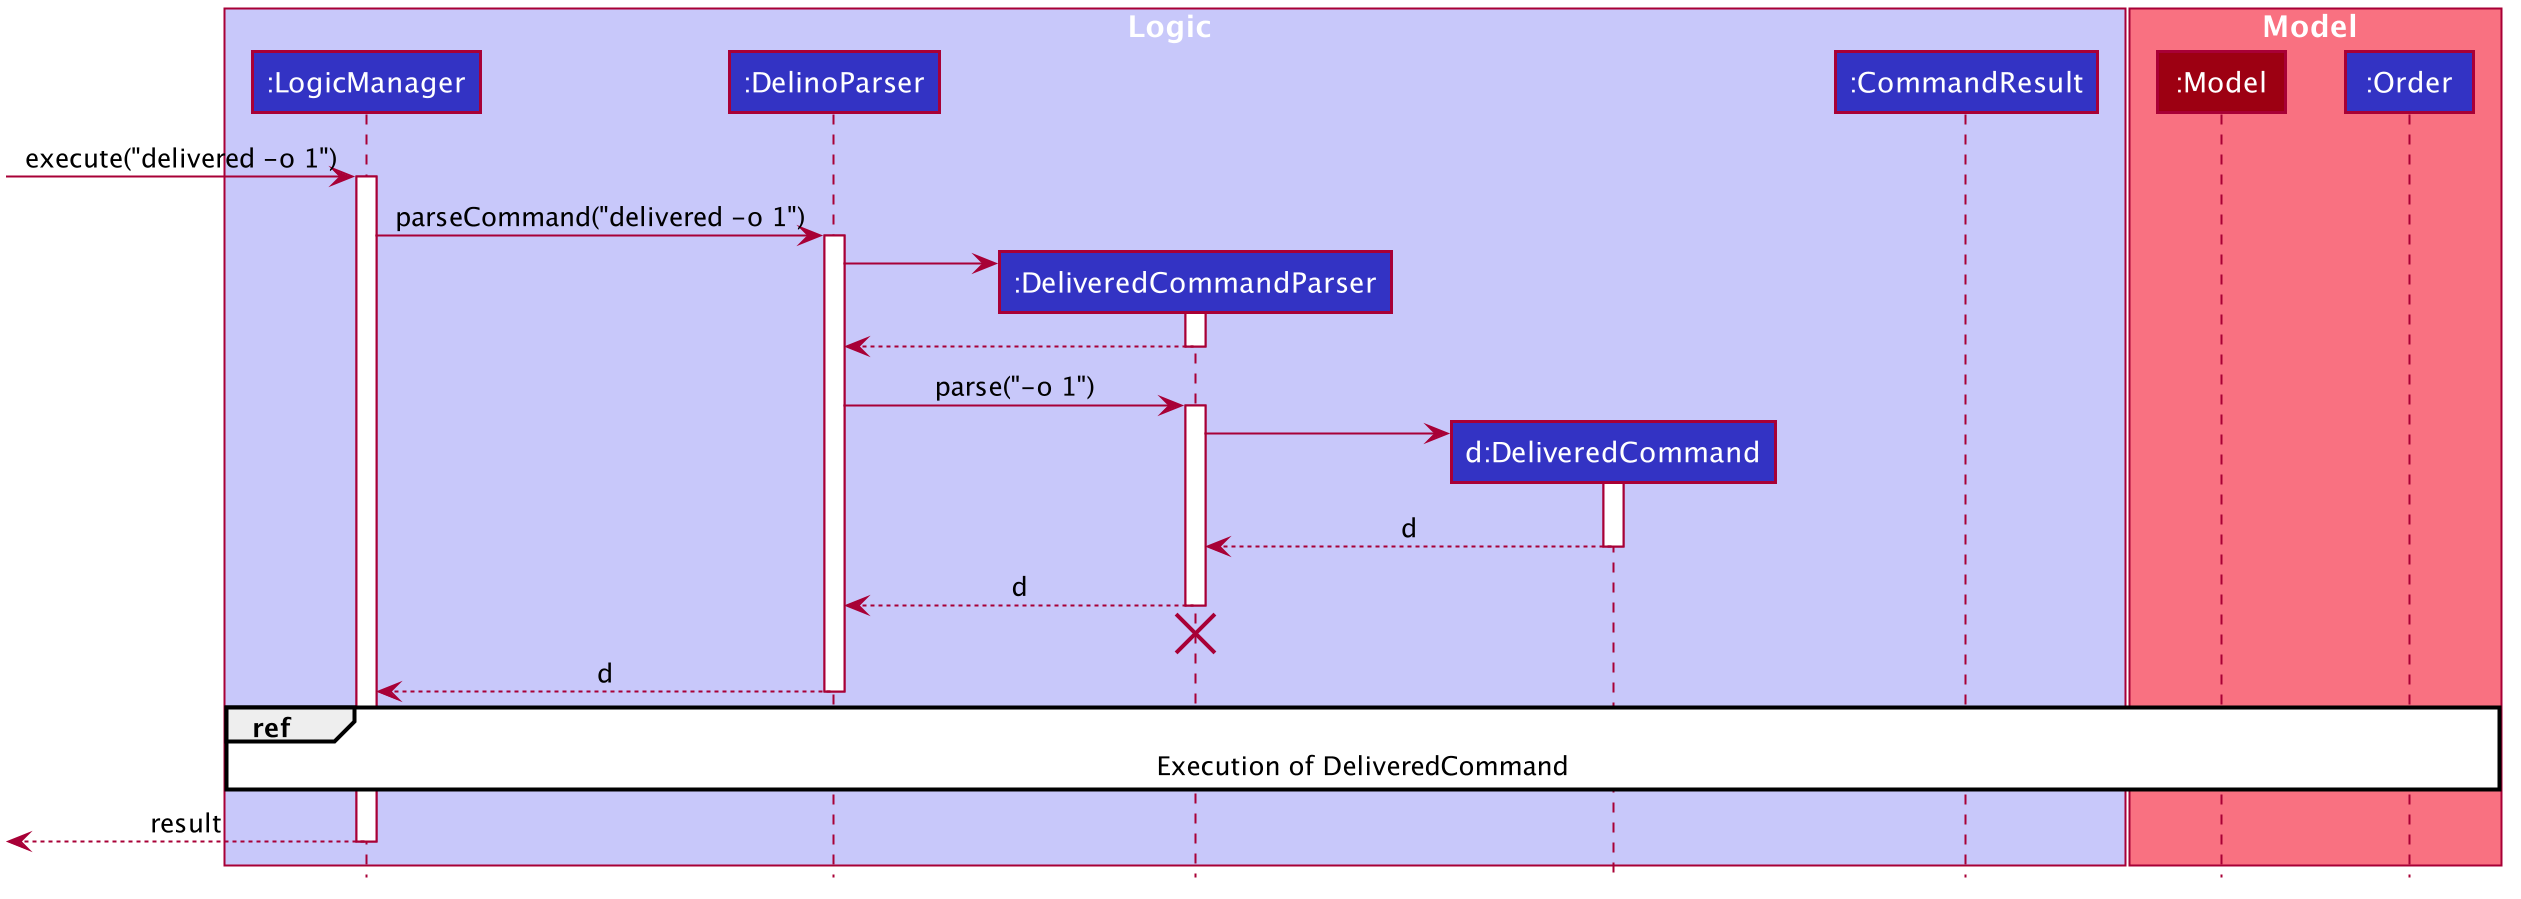
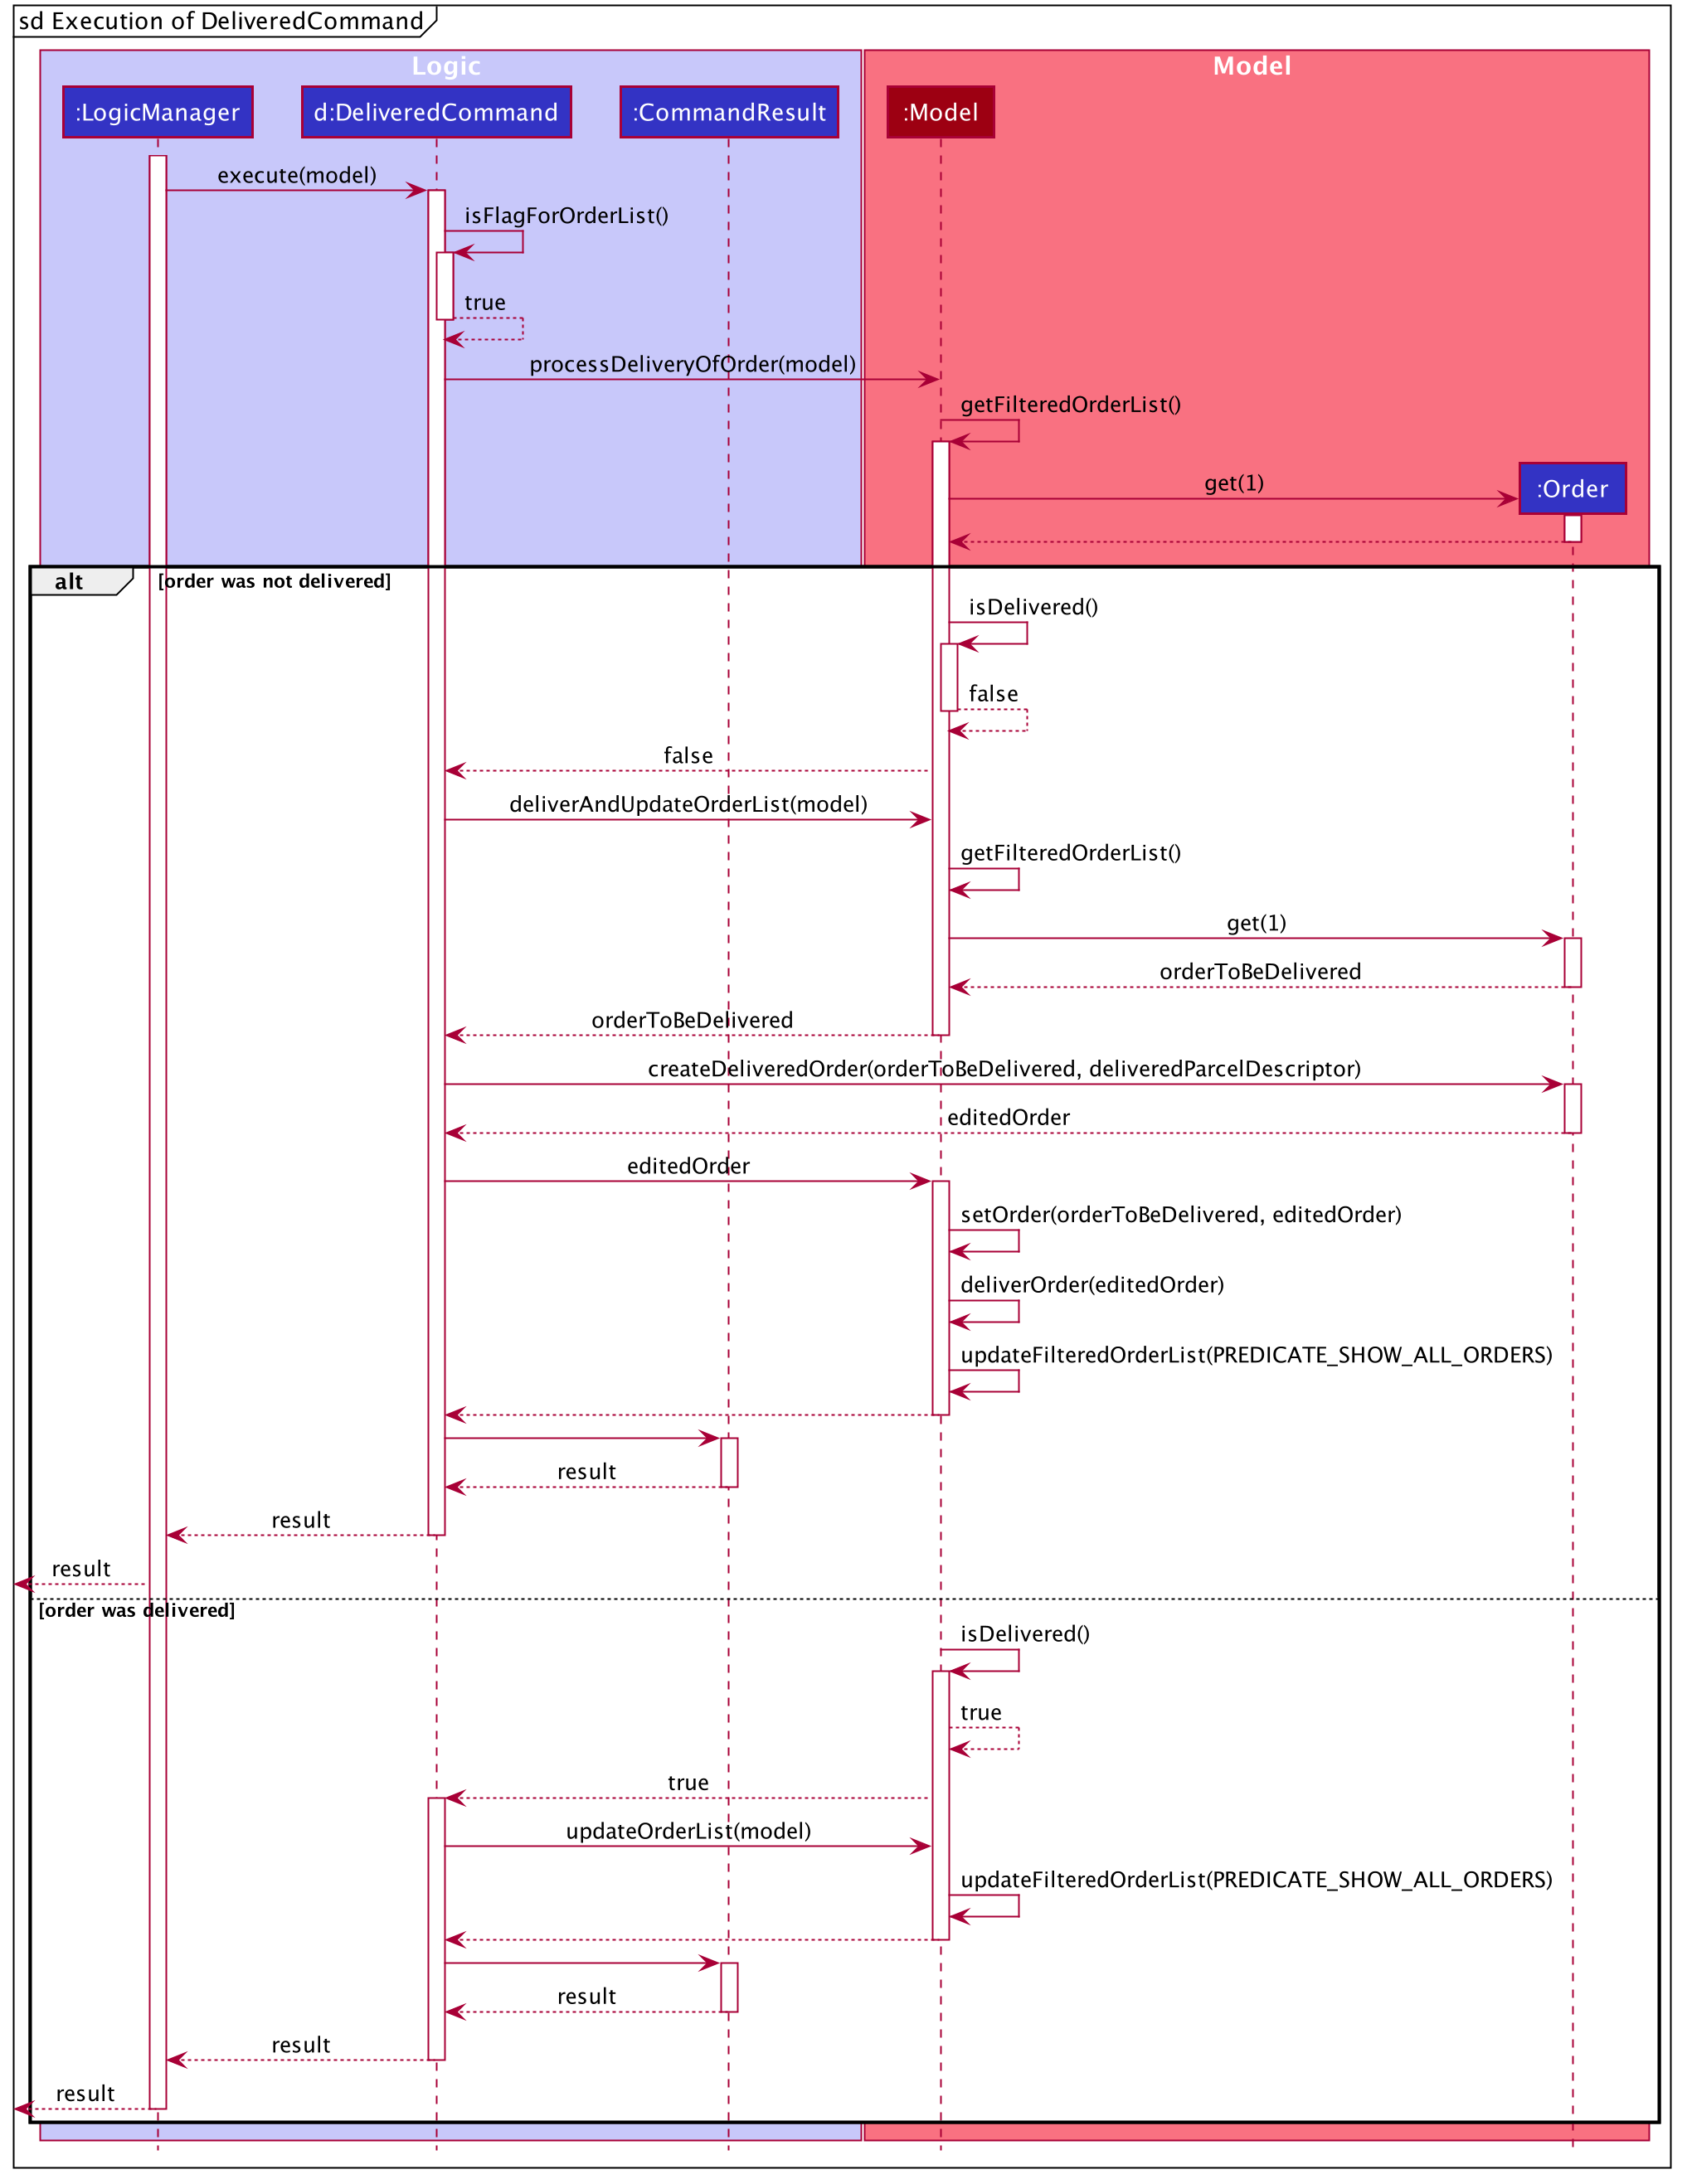
The arguments typed into Delino by the user will first be done by the execute
method in LogicManager. After which, an DelinoParser object will be created to parse
the input which is determined by the command word via the parseCommand method. In this case, it is the
delivered command word that will be parsed.
Then, a DeliveredCommandParser object will be created to parse the arguments after removing
the command word delivered from the user’s input. Based on the command word delivered,
a DeliveredCommand object will be created.
Subsequently, the parseCommand method in LogicManager will continue to create a CommandResult
based on the validity of the user’s input; which is determined by the execute method in
DeliveredCommand.
The execute method of DeliveredCommand will first check if a valid
FLAG is present in the user’s input. If the FLAG
is not valid, a CommandException will be thrown to the user to tell him/her that their
input was invalid and tell them the format which their input should follow.
If a valid FLAG is present, this will trigger the
processDeliveryOfOrder method in DeliveredCommand which will check if
a valid INDEX is present in the user’s input.
If the INDEX is not valid, processDeliveryOfOrder method will throw
a CommandException to the user; telling him/her that their input was invalid and the format
that their input should follow. i.e. delivered FLAG
INDEX
If both FLAG and INDEX are valid, an Order
or ReturnOrder object will be created based on the FLAG.
The INDEX will determine which order or return order to take from
the order list or return order list respectively using the appropriate getter method.
The Order or ReturnOrder object will be checked to see if it was delivered using the checkIfOrderWasDelivered(model) method.
If the Order or ReturnOrder was already delivered, this will call the updateOrderList(model) or
updatedReturnOrderList(model) method respectively in DeliveredCommand and a new
instance of CommandResult will be created to tell the user that the order or return order was delivered.
If the Order or ReturnOrder was not delivered, this will call the deliverAndUpdateOrderList(model) or
deliverAndUpdateReturnOrderList(model) respectively in DeliveredCommand.
In these methods, the particular Order or ReturnOrder will be retrieved from the
model using the getFilteredOrderList() or getFilteredReturnOrderList() method.
Based on the retrieved Order or ReturnOrder, a new Order or ReturnOrder with the delivered
delivery status will be instantiated using the createDeliveredOrder or createDeliveredReturnOrder methods respectively.
Then, the setOrder or setReturnOrder method will be called to replace the original Order or ReturnOrder object
respectively in model. The deliverOrder or deliverReturnOrder method will be called to to set the
delivery status of the object to delivered. Then, the updateFilteredOrderList() method or
updateFilteredReturnOrderList() method to update the list in the model.
Based on the new updates, a new CommandResult object will be instantiated to print the message success to the user.
Use Cases
This whole section on use cases for Help can be found here. This link is provided in the event if some of the cross links are not working, as they refer to documents done by another team member.
Use case: UC08 - Request for help
MSS
-
User requests to list all commands in Delino
-
Delino opens a new window after execution of the help command.
-
Delino display the list of commands and a button to provide user a link to Delino’s User Guide
Use case ends.
Extensions
-
1a. Delino detects invalid syntax.
-
1a1. Delino shows an error message to tell user the right way to use the help command.
Use case ends.
-
-
1b. Delino detects additional non-whitespace characters after the command word, help.
-
1b1. Delino shows an error message to tell user the right way to use the help command.
Use case ends.
-
This whole section on use cases for Return can be found here. This link is provided in the event if some of the cross links are not working, as they refer to documents done by another team member.
Use case: UC11 - Returning an order
MSS
-
User wants to return an order or create a new return order.
-
User requests to return an order or create a new return order.
-
Either an order will be converted to a return order or a new return order will be created
-
Delino displays the updated return order list with the new return order.
Use case ends.
Extensions
-
2a. Delino detects invalid syntax from user input.
-
2a1. Delino shows an error message.
Use case ends.
-
-
2b. Delino detects invalid parcel attributes.
-
2b1. Delino shows an error message to the user.
Use case ends.
-
-
2c. Delino detects invalid
TRANSACTION_ID, i.e. order with the givenTRANSACTION_IDdoes not exist.-
2c1. Delino shows an error message to the user.
Use case ends.
-
-
2d. Delino detects invalid
RETURN_TIMESTAMP, i.e. order with the givenRETURN_TIMESTAMPis bfeore the delivery time stamp of the order.-
2d1. Delino shows an error message to the user.
Use case ends.
-
-
2e. Delino detects missing parcel attributes.
-
2e1. Delino shows an error message to the user.
Use case ends.
-
This whole section on use cases for Delivered can be found at here. This link is provided in the event if some of the cross links are not working, as they refer to documents done by another team member.
Use case: UC04 - Mark order or return order as delivered
MSS
-
User wants to mark an order or return order as delivered.
-
User request to mark order or return order as delivered.
-
Delino changes the delivery status of the specified order or return order to delivered.
-
Delino will display an updated order list or return order list.
Use case ends.
Extensions
-
2a. Delino detects invalid syntax from user input.
-
2a1. Delino shows an error message.
Use case ends.
-
-
2b. Delino unable to detect any parcel with the
INDEXprovided.-
2b1. Delino shows error message to the user.
Use case ends.
-
-
2c. Delino unable to detect valid
INDEXprovided.-
2c1. Delino shows error message to the user.
Use case ends.
-
-
2d. Delino unable to detect valid
FLAGprovided.-
2d1. Delino shows error message to the user.
Use case ends.
-
Glossary
This whole section on command prefixes can be found at here. This link is provided in the event if some of the cross links are not working, as they refer to documents done by another team member.
| Prefix | Meaning | Used in the following Command(s) |
|---|---|---|
ot/ |
Order Type |
|
tid/ |
Transaction ID |
|
n/ |
Customer Name |
|
a/ |
Address |
|
p/ |
Phone Number |
|
e/ |
||
dts/ |
Delivery Date And Time |
|
rts/ |
Return Date and Time |
|
w/ |
Warehouse Location |
|
cod/ |
Cash On Delivery |
|
c/ |
Comments by Customer |
|
type/ |
Type of Item |
This whole section on command flags can be found at here. This link is provided in the event if some of the cross links are not working, as they refer to documents done by another team member.
| Flag | Meaning | Used in the following Command(s) |
|---|---|---|
-f |
Force clear, no user confirmation will be requested |
|
-o |
Order flag, Operation on order list |
|
-r |
Return Order flag, Operation on return order list |
Appendix G: Instructions for Manual Testing
This whole section on the delivered feature’s instructions for manual testing can be found at here. This link is provided in the event if some of the cross links are not working, as they refer to documents done by another team member. === Mark parcel as delivered
-
Mark a parcel’s delivery status as delivered based on its
INDEXandFLAGwhenever the parcel has been delivered.-
Delivered command format:
deliveredFLAGINDEX -
Prerequisite: Ensure that your order list or return order list has at least one order.
-
Test case:
delivered-o1
Expected: The first order in the currently displayed order list will be marked as delivered -
Test case:
delivered-r2
Expected: The second return order in the currently displayed return order list will be marked as delivered -
Test case: Invalid syntax
Expected: No parcel is marked as delivered. The error message will be displayed on the error response box describing the error
-
This whole section on the return feature’s instructions for manual testing can be found at here. This link is provided in the event if some of the cross links are not working, as they refer to documents done by another team member. === Returning an order
-
Convert a delivered order into a return order or create a new return order
-
Return command format:
returnTRANSACTION_IDNAMEADDRESSPHONE_NUMBEREMAILRETURN_TIMESTAMPWAREHOUSE_LOCATION[COMMENTS_BY_CUSTOMER][TYPE_OF_ITEM]
ORreturnTRANSACTION_IDRETURN_TIMESTAMP -
Test case:
returntid/9876543210n/John Doea/Blk 572 Hougang st 51 #10-33 S530572p/98766789e/johndoe@example.comrts/2020-05-20 1300w/Yishun
Expected: Creates a new return order with the above details and adds it into the return order list. This will be displayed on the GUI -
Test case:
returntid/1023456789n/Amos Cheonga/Blk 572 Hougang st 51 #11-37 S530572p/90010019e/amoscheong@example.comrts/2020-05-10 1650w/Marsilingc/Leave it at the risertype/glass
Expected: Creates a new return order with the above details, including type and comments and adds it into the return order list. This will be displayed on the GUI -
Test case:
returntid/1023456789rts/2020-05-12 1300
Expected: Checks if an order with the given Transaction ID exists. If it exists and it was delivered, check if the given return time stamp is after the delivery time stamp. If it is both delivered and the return time stamp is after the delivery time stamp, the order will be converted into a return order and added into the return order list. -
Test case: Invalid Syntax
Expected: No return order is added. Error details shown in the response message. A help message displayed for user to use the return command accordingly. -
Test case: Return order with invalid Transaction ID in order list
Expected: An error will occur and a message will be displayed, stating that order with the given Transaction ID cannot be found in the order list. -
Test case: Return order with invalid return time stamp
Expected: An error will occur and a message will be displayed, stating that the return time stamp is not valid. -
Test case: Return order with missing parcel attributes
Expected: An error will occur and a message will be displayed, indicating the right message usage of the return feature. -
Test case: Order to be converted was not delivered
Expected: An error will occur and a message will be displayed, indicating that the order was not delivered and cannot be returned.
-
This whole section on the help feature’s instructions for manual testing can be found at here. This link is provided in the event if some of the cross links are not working, as they refer to documents done by another team member. === Help
-
Display a list of available commands to user
-
Test case:
help
Expected: A list of commands will be displayed in a new pop-up window and the response box will indicate a successful command. -
Test case: Invalid syntax
Expected: An error will occur and the response box will show an error message
-